• Quick Installation Guide
  • Step by Step
  • Admin User Guide
01. Introduction
  • Presence of the Machine
02. Hardware Requirement
03. Acquire the Software
04. System Configuration
05. Recover System via RAID
06. FAQ

The Presence of the Running Machine on the Internet

Everything has a start, and has an end.

Deploying a server over the Internet is different from setting up a local server without being revealed to outside people. For a server to be unknown on the Internet by fully-qualified hostname, it requires some registration processes. Furthermore, since the server is known to the public, some security measures should have been taken to avoid the abuse of the server.

This package includes basic elements for network operation, for example, DNS, FTP, firewall, backup storage server, VPN (Virtual Private Network) and Email .

We start from the introduction on Domain name registration with the following diagram:
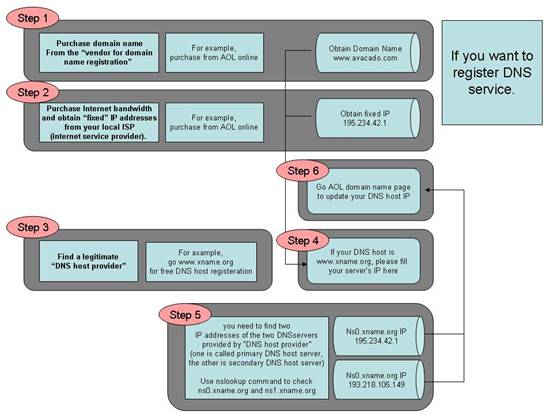
1. Purchase domain name from the “vendor for domain name registration”

The “Domain Name Registration Vendor” usually will provide a Web interface for you to query your desired domain name. You may find some of the domain names you like have been acquired by other people. It is necessary for you need to find a domain name that is not being occupied. And then make the purchase of the domain name from the “Domain Name Registration Vendor” to complete this step.

2. Purchase Internet bandwidth and obtain “static” IP addresses from your local ISP (internet service provider).

Usually, the ISP will give you a set of IP addresses that may include a list of public IP addresses, the netmask, and the default Gateway. This IP information will be used when you install the software and configure your server. You shall keep the information in a safe place once you obtain that from your ISP.

3. Find a legitimate “DNS host provider”

It is to host your domain name (which you get from step 2) and the associated static IP address (which you get from step 3) record so that everybody on Internet can use your domain name to reach your server. Usually, the “DNS host provider” will provide a Web interface to allow you to input your domain name and the mapped IP address record into their hosted server. This step is completed after you have entered the data into the web page.

4. Update the record at the “Domain Name Registration Vendor” server with the IP addresses of the “DNS host provider”.

At this step, you need to access the website provided by “Domain Name Registration Vendor”. If you do not know the DNS server’s IP addresses of your “DNS host provider”, you can do as follows at your Windows command prompt (the command prompt is reached through Start > Run > cmd), issue the command

  C:\>nslookup DNS-server- name-from-your-provider

The system will respond with the IP address of your “DNS host provider”. Usually, you need to find two IP addresses of the two DNS servers provided by “DNS host provider” (one is called primary DNS host server, the other is secondary DNS host server). The two IP addresses will be entered into the record in the place of “Domain Name Registration Vendor”. We suggest using primary DNS server and secondary server from different places. The Azblink server package also provides DNS server. But to allow people all over the world can query your domain, you should have your domain name placed in different DNS servers to alleviate the load.
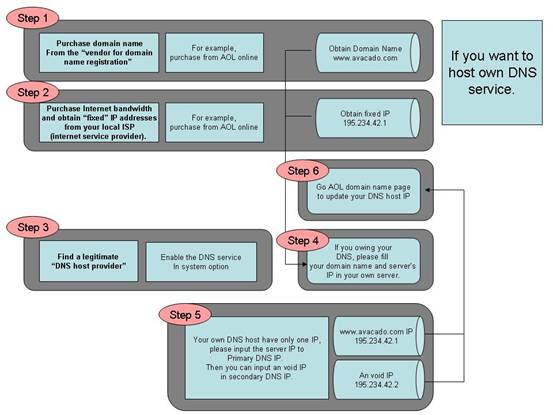
5. Wait until it is in effect.

In general, it needs 24 hours to 72 hours to have your domain name record of the server populated across the world so that people can use domain name to access your server.
Those are the general steps as long as you want to have your own private server(s) on Internet.

TOP

Storage Function Setting

When you first touch Storage, you must be very confused; it seems very simple to complete the setting on Admin Side, but you will get lost when you try to use it. Never mind, all of your problems will be resolved if you follow these steps.

Admin Side

1. Go to Storage>>Setting>>Modify Backup Time, set the backup time.
  (To avoid backup failure caused by network jam, we suggest you do it at free time or set everal time points.)

2. Go to Storage>>Setting>>Backup Rules, you will see how often the data changes, and how many time
  points you may need for restoring data. Generally, time length for keeping data of this system is un-limited,
  the longer you set for it, the more time points you can own. Accordingly, you should prepare bigger hard
  disk for your host. The setting for “Threshold for Sending Alerts” should avoid decimal.


3. Storage>>Setting>>Modify Threshold Mail Alert, you’d better fill in valid and intact accounts, then
  those emails sent by server will arrive your mailbox exactly when backup data usage is over specific
  percentage of the hard disk capacity.


4. To manage data in backup server, you can go to System>>User>>Reset Account, reset the password
   for backup. Then you are allowed to manage all backup data in this server by using \\hostname\backup or
   \\<host’s IP_Address>\backup. (During this process, please remember to delete back or unneeded data by
    using date folders. Changing the data at random maybe causes it disordered and unable to backup.)


User Side

1. Please set the host or folder which you want to backup into share mode.
  (The share names should be set in English format, since Chinese format will be shown as jumbled codes on
  Admin Side.)

2. Enter into Storage by user’s account.


3. In Backup>>Setting, do you plan to backup for single folder or the whole host?

The whole host. Select “Backup Target Host Name”; fill in host name or IP address which the host uses, 
 together with the host’s login account and password, then submit. (Login account of the host is
 necessary while password is dispensable.)

Single folder. Select “Backup Target Share Name”, type the name in \\hostname\share or
 \\IP_Address\ share, and the login account and password, then submit. (Login account of the host is
 necessary while password is dispensable.)

4. At the page of Backup>>Diagnostic & Backup, please select the items in backup list, and test if those
  hosts or folders connect with the backup server successfully or not.

  Successful. It means connected successfully; press “Backup ASAP” to perform backup immediately if
  it is a single file. Or you can just wait for the backup time you set before, system will perform backup
  automatically then.

  Failed. Failed to connect, that means there is some problem with the network setting, or the
  
corresponding host is not working. Thus, you have to check if the network architecture or settings
  function well or not.

5. To view or restore data, go to Extract>>Host Setting, select “Submitted backup list” and
  choose the backup data you want to view, and press Next.

6. Extract>>Criteria View, fill in the date of data that you want to restore, and set the filter condition and
  submit, press the link provided at the extract result, and type the password into the login prompt, then
  you can view the data you want to restore.

TOP

The Presence of the Running Machine on the Internet

Everything has a start, and has an end.

Deploying a server over the Internet is different from setting up a local server without being revealed to outside people. For a server to be unknown on the Internet by fully-qualified hostname, it requires some registration processes. Furthermore, since the server is known to the public, some security measures should have been taken to avoid the abuse of the server.

This package includes basic elements for network operation, for example, DNS, FTP, firewall, backup storage server, VPN (Virtual Private Network) and Email .

We start from the introduction on Domain name registration with the following diagram:

1. Purchase domain name from the “vendor for domain name registration”

The “Domain Name Registration Vendor” usually will provide a Web interface for you to query your desired domain name. You may find some of the domain names you like have been acquired by other people. It is necessary for you need to find a domain name that is not being occupied. And then make the purchase of the domain name from the “Domain Name Registration Vendor” to complete this step.

2. Purchase Internet bandwidth and obtain “static” IP addresses from your local ISP (internet service provider).

Usually, the ISP will give you a set of IP addresses that may include a list of public IP addresses, the netmask, and the default Gateway. This IP information will be used when you install the software and configure your server. You shall keep the information in a safe place once you obtain that from your ISP.

3. Find a legitimate “DNS host provider”

It is to host your domain name (which you get from step 2) and the associated static IP address (which you get from step 3) record so that everybody on Internet can use your domain name to reach your server. Usually, the “DNS host provider” will provide a Web interface to allow you to input your domain name and the mapped IP address record into their hosted server. This step is completed after you have entered the data into the web page.

4. Update the record at the “Domain Name Registration Vendor” server with the IP addresses of the “DNS host provider”.

At this step, you need to access the website provided by “Domain Name Registration Vendor”. If you do not know the DNS server’s IP addresses of your “DNS host provider”, you can do as follows at your Windows command prompt (the command prompt is reached through Start > Run > cmd), issue the command

  C:\>nslookup DNS-server- name-from-your-provider

The system will respond with the IP address of your “DNS host provider”. Usually, you need to find two IP addresses of the two DNS servers provided by “DNS host provider” (one is called primary DNS host server, the other is secondary DNS host server). The two IP addresses will be entered into the record in the place of “Domain Name Registration Vendor”. We suggest using primary DNS server and secondary server from different places. The Azblink server package also provides DNS server. But to allow people all over the world can query your domain, you should have your domain name placed in different DNS servers to alleviate the load.

5. Wait until it is in effect.

In general, it needs 24 hours to 72 hours to have your domain name record of the server populated across the world so that people can use domain name to access your server.
Those are the general steps as long as you want to have your own private server(s) on Internet.

Hardware Requirement

X86-compliant hardware

Nowadays, this kind of application would not need computation power like large-scaled scientific research projects. Most of the constraints come from input/output operations from one device to another device. So, instead of choosing powerful machines, we suggest using reliable ones.

Hardware with Ethernet interface(s):

If you would like to put the server inside a firewall, it only needs one Ethernet interface on that machine. To use firewall on the same machine, it needs two Ethernet interfaces.

Uninterrupted Power System

For the sake of system stability, we recommend to equip the server with mini UPS (Uninterrupted Power System) to protect the server from sudden power outage. Power outage or power surge would damage some components. To protect the investment, it is a good choice to have UPS ready.

Switch/Hub

Switch or hub bridges traffic from each host and each host is responsible for collision detection and retransmission. If your network environment has more PCs that can not be plugged into one hub or switch, an additional Ethernet switch shall be used to expand the connectivity.

Wireless Router (Recommended, but not necessary)

Wireless router or wireless access point becomes popular in office and home environment. This device can deliver data just like a wired Ethernet, and provide an efficient solution for people with mobile computers. It should be noticed to deploy wireless access point by avoiding IP address conflict.

TOP