Configure Via Web Browser But how do we know the IP address fetched by the DHCP client on the server in order to access via Web Browser ? There are many possible ways to know that: if you have “NetBIOS” or “Client for Microsoft Network” installed on your PC, you might use the hostname “azstart” to try
http://azstart/apps/
( login: admin, password: admin123 )
( This is admin account from Web interface. You are required to change the password at the first time you access that page. )
The system will display a page to ask you to change the hostname and admin password at the time you first login. You will be asked to enter our pre-defined admin password ( which is “admin123” ) and the new password you are going to set and re-type the new password to confirm it.
Please note that if DHCP client fails to obtain IP address, the server configuration page will not be accessed from your Web Browser. In that case, you have to use “Console” to configure the server first.
“Azstart” is the predefined hostname for the server after the CD installation is done. If you like to use the console, you can just login to the server from console by typing
# login: reset
#password: root123
( this can only be used on console )
But this method is only provided for you when the network is not working.
“Console” is the term that we use to describe the “direct” input/output device attached to the machine and allow people to issue commands and view the system response messages without going through the network. In other words, it is just that you connect your monitor to your machine’s Video port with the keyboard there.
However, it is advised that you should use Web interface to configure the server even though you are familiar with Linux or Unix ( the password for “root” user is “root123” ). This software package has been developed based on Linux, but the configuration is not exactly the same as the other Linux systems you have seen elsewhere. For some easy things like “adding user” or “setting IP address”, if you do not use Web interface or the procedures described here, it would break the data integrity and the system can not function well.
The account “admin” from Web interface is for you to configure the system. It is with the password “admin123” at the moment when you finish the installation from CD. Other User IDs can be created via Web interface from “admin”. We will introduce that later. But the other User IDs do not have the privileges to modify the system configuration; they only can use the system functions without touching the modification to affect the basic operation of the system. So, it is very important that you should protect your “admin” account by changing the “predefined” password from CD.
If you do not have DHCP server running on your network, or for some reasons, you still can not access the server via the method mentioned above, you can just set IP address via the console of the server.
The console tool is provided for the use under the environment without DHCP server or you make mistake on network setting so that you can not use Web interface to configure the system. To use this simple console tool, you have to login from console by the following user ID:
#login: reset
#password: root123
( this can only be used on Console )
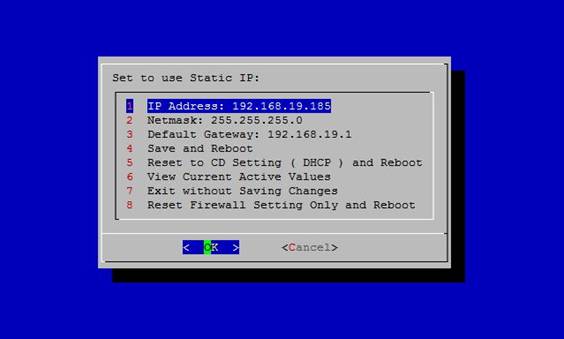
After that, you will see some messages similar to the following:

1 IP Address: 172.16.1.3
2 Netmask: 255.255.255.0
3 Default Gateway: 172.16.1.1
4 Save and Reboot
5 Reset to initial CD setting (DHCP) and Reboot
6 View Current Active Values
7 Exit without Saving Changes
8 Reset Border Control Setting Only and Reboot
Option 1, 2, and 3 is for you to set IP address on the interface eth0 so that you can use the Web Browser to continue the configuration. After you supply the correct data on Option 1, 2, and 3, you can use 4 to save the result and reboot the machine. Option 5 is to restore the initial network setting we put on CD – it means DHCP client will be running on eth0. You can just use arrow keys to move to the items you are going to modify and hit “enter” key on the keyboard.
If the network is still not up and running, that could mean the software package does not support your Ethernet card. You can use option 7 to check if “eth0” is present in the listing. Or you might also login as “root” from console and issue the command
# ifconfig –a
And check if you can get “eth0” or “eth1” on the list. If none, that means the software can not detect the Ethernet card(s). |