- Quick Installation Guide
- Step by Step
- Admin User Guide
05. Recover System via RAID
|
The Presence of the Running Machine on the Internet
Everything has a start, and has an end.
Deploying a server over the Internet is different from setting up a local server without being revealed to outside people. For a server to be unknown on the Internet by fully-qualified hostname, it requires some registration processes. Furthermore, since the server is known to the public, some security measures should have been taken to avoid the abuse of the server.
This package includes basic elements for network operation, for example, DNS, FTP, firewall, backup storage server, VPN (Virtual Private Network) and Email .
We start from the introduction on Domain name registration with the following diagram:
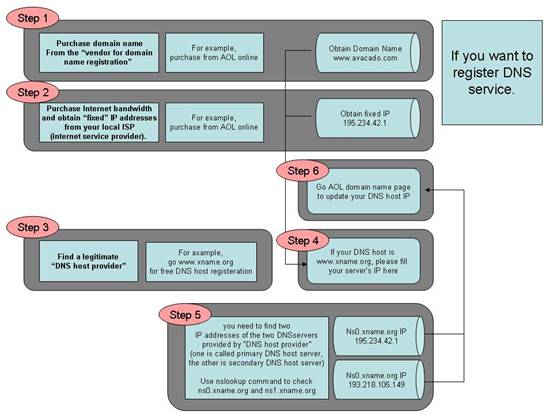
1. Purchase domain name from the “vendor for domain name registration”
The “Domain Name Registration Vendor” usually will provide a Web interface for you to query your desired domain name. You may find some of the domain names you like have been acquired by other people. It is necessary for you need to find a domain name that is not being occupied. And then make the purchase of the domain name from the “Domain Name Registration Vendor” to complete this step.
2. Purchase Internet bandwidth and obtain “static” IP addresses from your local ISP (internet service provider).
Usually, the ISP will give you a set of IP addresses that may include a list of public IP addresses, the netmask, and the default Gateway. This IP information will be used when you install the software and configure your server. You shall keep the information in a safe place once you obtain that from your ISP.
3. Find a legitimate “DNS host provider”
It is to host your domain name (which you get from step 2) and the associated static IP address (which you get from step 3) record so that everybody on Internet can use your domain name to reach your server. Usually, the “DNS host provider” will provide a Web interface to allow you to input your domain name and the mapped IP address record into their hosted server. This step is completed after you have entered the data into the web page.
4. Update the record at the “Domain Name Registration Vendor” server with the IP addresses of the “DNS host provider”.
At this step, you need to access the website provided by “Domain Name Registration Vendor”. If you do not know the DNS server’s IP addresses of your “DNS host provider”, you can do as follows at your Windows command prompt (the command prompt is reached through Start > Run > cmd), issue the command
C:\>nslookup DNS-server- name-from-your-provider
The system will respond with the IP address of your “DNS host provider”. Usually, you need to find two IP addresses of the two DNS servers provided by “DNS host provider” (one is called primary DNS host server, the other is secondary DNS host server). The two IP addresses will be entered into the record in the place of “Domain Name Registration Vendor”. We suggest using primary DNS server and secondary server from different places. The Azblink server package also provides DNS server. But to allow people all over the world can query your domain, you should have your domain name placed in different DNS servers to alleviate the load.
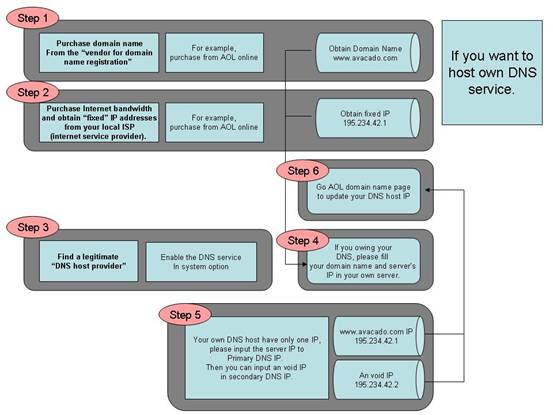
5. Wait until it is in effect.
In general, it needs 24 hours to 72 hours to have your domain name record of the server populated across the world so that people can use domain name to access your server.
Those are the general steps as long as you want to have your own private server(s) on Internet. |
| TOP |
|
Basic Web Setting
After the system installation be finished, take the CD out, reboot the machine, and then start the basic network setting for the system.
There are two modes to configure the host, one is console mode on the local host, and the other is Web interface mode on Client. You can choose the one you like or just by the network environment of that time.
Console Mode --- configure on local host
A. Input account and password to login into console configuration interface. Input account and password to login into console configuration interface.
login:reset
Password:root123
B. You will see 7 options after login in You will see 7 options after login in
1. IP Address:192.168.19.185
2. Netmask:255.255.255.0
3. Default Gateway:192.168.19.1
4. Save and Reboot
5. Reset to CD setting (DHCP) and Reboot
6. View Current Active Values
7. Exit without Saveing Changes
C. Is there any fixed ip ready for configuration?
 Yes, type fixed IP address, Netmask and Default Gateway into option 1.2.3. severally.
You can use up Yes, type fixed IP address, Netmask and Default Gateway into option 1.2.3. severally.
You can use up
and down arrow to choose the option who needs edit, and then press enter
to configure. After option 1.2.3
be correctly configured, you can use option 4 to save these
changes and reboot the machine.
(If you have
no idea about the Netmask and Default Gateway, you can just refer to the
Completion List provided by your
ISP.)
 No, if there is a DHCP server providing the IP assignment services in your network, you can
just use option6 No, if there is a DHCP server providing the IP assignment services in your network, you can
just use option6
to check the IP address assigned by the system. After checking eth0,
please write down the IP address, and
remember to use option 7 to quit the Console
interface.
D. By the IP address you set or the one obtained from DHCP, you can view the configuration
page of the By the IP address you set or the one obtained from DHCP, you can view the configuration
page of the
system host via Web browser on remote Client.
※ DHCP server exists in your network, but if you find eth0 shown as IP 1.2.3.4 when you check current system value, please check if your network cables plug into wrong place (eh0 and eth1 may been exchanged), or if there are some problems on other equipments. (Refer to Q&A in the manual)
Web interface Mode --- configure at sub-network
A. Is the host, which you installed system on, connected by other hosts?
 Yes, please confirm the host is the only DHCP sever
(that is to say the network should not have other Yes, please confirm the host is the only DHCP sever
(that is to say the network should not have other
DHCP servers, e.g. IP distributor), and then start from C.
 No, please complete basic network configuration according to B’s instruction. No, please complete basic network configuration according to B’s instruction.
B. A network cable makes host’s eth1 port and the Hub connected. And use another cable to
connect to A network cable makes host’s eth1 port and the Hub connected. And use another cable to
connect to
Hub, let the other end of this cable link to a common Client computer.
C. Choose one Client computer from the sub-network which connected to the system host. Choose one Client computer from the sub-network which connected to the system host.
D. Open command prompt on the Client (suppose it’s a Windows machine), type “ipconfig” and
then press
“Enter” button, check whether the Default Gateway is 172.16.9.1 or not?
 Yes, just close the command prompt, enter into next step. Yes, just close the command prompt, enter into next step.
 No, type “ipconfig/release” to release the old IP in your computer, and then type
“ipconfig/renew” to get No, type “ipconfig/release” to release the old IP in your computer, and then type
“ipconfig/renew” to get
new assigned IP.
(If you are still unable to obtain new IP, please check if the network has other DHCP sever
or not, or maybe
TCP/IP of this Client does not use the mode of “Obtain an IP Address
Automatically”.)
E. Open your Browser, and type http://172.16.9.1 at the address bar to link. When you visit the
page at the Open your Browser, and type http://172.16.9.1 at the address bar to link. When you visit the
page at the
first time, you will see 4 items;
Host Name:Please set Host Name for this host.
Admin Password:Default password is admin123.
New Admin Password:Please set new password.
Confirm Password:Please confirm your new password.
F. After you enter into system page, go to System>>Network, choose Internet or PPPoE
depending on the
situation.
 Choose Internet. At the Internet Interface, mostly, you should set the values for IP address / Netmask / Choose Internet. At the Internet Interface, mostly, you should set the values for IP address / Netmask /
Default Gateway and then submit, restart your machine and you will find it
already connected to Internet.
 Choose PPPoE. If you use PPPoE, remember to check the checkbox of “Turn on PPPoE”.
Fill in the account Choose PPPoE. If you use PPPoE, remember to check the checkbox of “Turn on PPPoE”.
Fill in the account
and password provided by ISP and submit, reboot your computer, then you
can connect to the network.
(Please refer to the sections of Configuration and Q&A in Quick
Installation Guide if you have any questions.) |
| TOP |
08. Storage and Data Backup
14. Web Phone (User Side)
|
What is the “right” value to be set for Rate Control?
What is the proper value to be set in the firewall on rate limit control? The answer lies on the performance of server(s). This is especially important when you try to protect the email server or http server from the flood of overwhelming requests in a very short period of time.
There are many mathematical models to predict the behavior. Here, we just use some well-known result from queuing theory.
Let the requests arriving at the system is a Poisson Process with rate  ; and the time spent on handling those requests is i.i.d. ( independent identical distribution ) with exponential distribution function, and that also can be formulated as a Poisson Process with processing rate ; and the time spent on handling those requests is i.i.d. ( independent identical distribution ) with exponential distribution function, and that also can be formulated as a Poisson Process with processing rate  . In stochastic process theory, it turns out to be a Birth and Death Problem. During the steady state, . In stochastic process theory, it turns out to be a Birth and Death Problem. During the steady state,
the expected queue length

In the scenario on the Email Server protection, if the processing rate of emails by the Email server is  emails per minute, and the queue length is given as N to protect the server. Thus, from the formula above, we can know how to set the rate limit on the firewall. emails per minute, and the queue length is given as N to protect the server. Thus, from the formula above, we can know how to set the rate limit on the firewall.
To be specific, given
Processing rate of emails: 12 emails/min
the average queue length expected: 20
then we have

Thus, in the firewall, we should set the peak rate limit on SMTP connection to 11 connections per minute to protect the email server from being bombarded by Spam emails.
What is the reason that this topic is brought up here? It is something to do with Email Server performance. Assume that you found out it took 5 seconds in average to process an email after scanning 150000 virus signature and content analysis to decide if it is a spam. Unfortunately, suddenly you started to have a lot of spam emails arriving at the rate larger than the processing rate mentioned above, and those spam emails come constantly day and night for quite a long time, what would happen?
Intuitively, everybody would know that it will have a lot of emails staying in queue to be processed so that the email server is always sluggish to any request.
Review the model we mention above, we have

It implies when the processing rate is almost equal to arrival rate, the queue length is going to infinity. So, if somebody claims to you that and email server can process 1 million emails a day, you should ask about how the test scenario is performed. If that scenario does not take data arrival rate into account, you should not expect that the email server can handle 1 million emails a day.
What can we do if we have quite large of spam emails coming in so that the system can not handle? If virus scan and content analysis take too much processing time, the best approach is: looking for other approach to eliminate spam emails faster. And before that “right” approach is complete, regulating the traffic into email server can be used by using rate control in the firewall.
But as you can predict, regulating the peak arrival rate for spam emails also hinders the arrival of “good” emails; it only keeps the server alive, but the other party might try quite a long time to have their emails delivered to your email server. It should combine with other methods to tackle the problem.
Email Server Defense
There are several straightforward ways to avoid overloading the email server under heavy volume of spam emails. For example, if there is no such recipient in this email server, that email could be rejected right away without going through virus scan or content analysis. However, it might open the opportunity for the spammers to use a quite long list of user names (the so-called dictionary attack ) to check the existence of valid users of the system. So, sometimes, people choose to swallow them and discard them silently without giving any clues to the spammers if the system performance is allowed.
A lot of spam emails come from hosts without fully qualified domain names; or they come from the IP addresses that do not have any records in reverse DNS lookup. Those can be used to screen spam emails. But it should be careful that this would also kill “good emails”.
For example, a lot of people do not put their IP addresses into reverse DNS records because of privacy reasons to avoid people collecting domain names by using IP addresses directly. And some people just put their email host name into DNS server with “A record” without “MX record” by hoping that the email server would not be identified as a target by spammers; or some people’s configuration is using different SMTP hosts to receive emails or send emails, or it has to go via mail relay. For those exceptions, you have to remedy them by using while list; for those places you know that your users would not received emails from, you might as well to put them into black list when the email server is under heavy volume of spam emails.
In the following, we will explain more on that to see how it is can be done via the provided functionalities.
Border Control Rate Limit Control
The following is the screen snapshot of the firewall rule setting. It can be navigated via “Border Control->Advanced->Add Rule”:
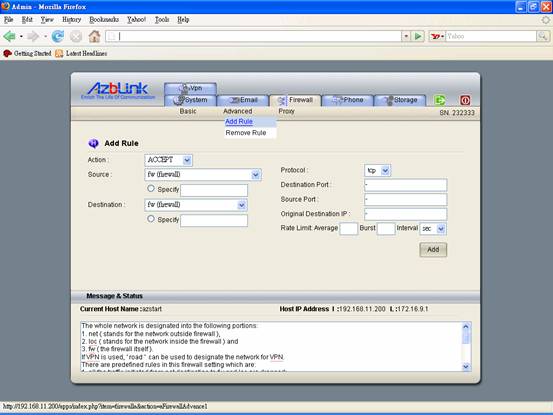
So, when we try to regulate the connection rate of incoming emails, it is suffice to put restriction on SMTP traffic. And we know SMTP is with TCP port 25. One the rule associating TCP port 25, we place “rate limit”.
In the field “rate limit”, “Average” means the system will compare the rate of the current traffic with the average value since the last reboot time of the machine; if it is over that limit, it blocks the connect. “Burst” means: on any measured unit of time interval, it should be not over this limit.
SMTP Connection Screening
While the volume of spam emails is over the processing power of “virus scan” and “content filtering”, we might just block the SMTP connection before those emails are processed. Navigating via “Email->Defense->Dynamic Screen”, you will find out there are several “check boxes” over there.
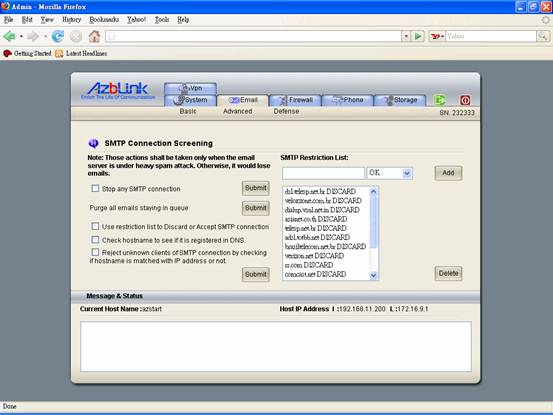
As indicated, those actions might also block the emails you would like to receive as well. To remedy that, you need to place those hosts or their IP addresses into “SMTP Restriction List” and tag them as “OK”. For those emails sending out from the hosts you obviously do not want to receive, just tag them as “DISCARD”.
That “SMTP Restriction List” will be used when the check box associated with SMTP Restriction List is checked.
But how can we collect the list about where to block? It needs some analysis. And remember: it is not necessary to block all the spam emails in this way; we only reduce the volume to the level that “virus scan” and “content filtering” can catch up.
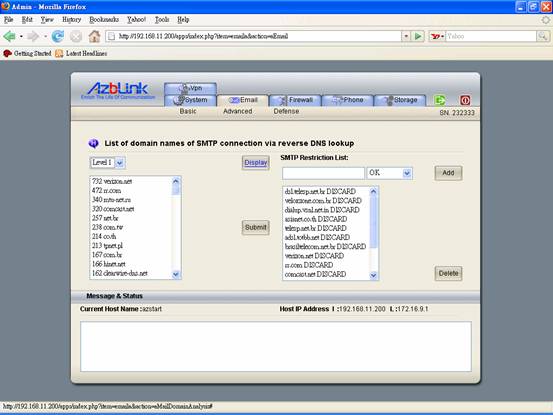
List of domain names of SMTP connection via reverse DNS lookup
If you have a chance to take a look at the statistics about the IP addresses using that spam emails, you might be surprised that they come from thousands of different IP addresses. IP spoofing can achieve this effect by faking source IP address in the IP header. Nowadays, most network gateways should have “ingress filtering” by rejecting the packets with source IP addresses within its network but coming from outside; or “egress filtering” to discard the packets by rejecting those packets with outside network IP address in source IP address field but originating from inside. If that is the case, we might assume that those spam emails come from the Open Proxies or Hosts controlled by the spammers by hopping IP addresses.
A lot of IP addresses are used by spammers only once. Thus, blocking specific IP address might not be helpful at all. Thus, we might just try to do reverse DNS lookup on those collected IP addresses to check the domain names associating those IP addresses.
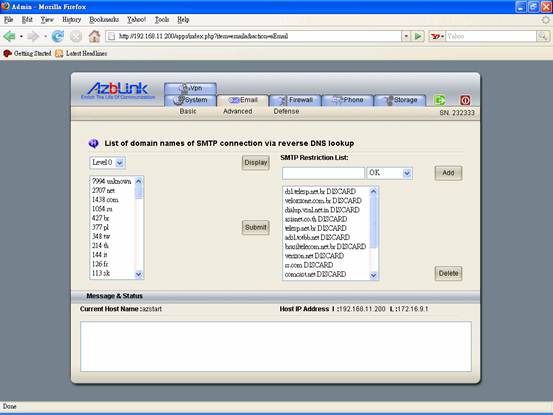
The following diagram shows the implementation of this scheme. It has “Level 0”, “Level 1”, and “Level 2” to show different tier of the domain names. By digesting the information, it might easily to get those spam mails come from. Under some circumstances, people just use “country code” to block spam emails to alleviate the processing load. Anyway, you can just add those suspicious domains into restriction list.
The first column in the list box provides the number of connection times from that specific domain from top to down. If 99% of emails are classified as spam and they are coming from some domains, we can just put those domains into list to discard those emails without further processing.
However, if you have chance to use “ Level 2” analysis, a lot of IP addresses could not be resolved via reverse DNS lookup; they are tagged as “unknown”.
If “reverse DNS lookup” is used as criteria to reject emails, all of those emails from “unknown” will be rejected. But as we mentioned previously, it could also block the legitimate email servers. Thus, we might need more detailed analysis from “unknown”.
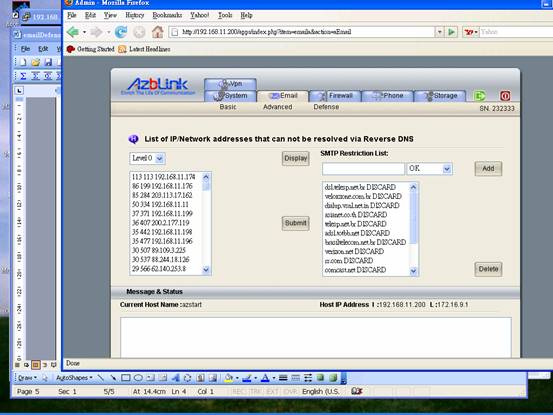
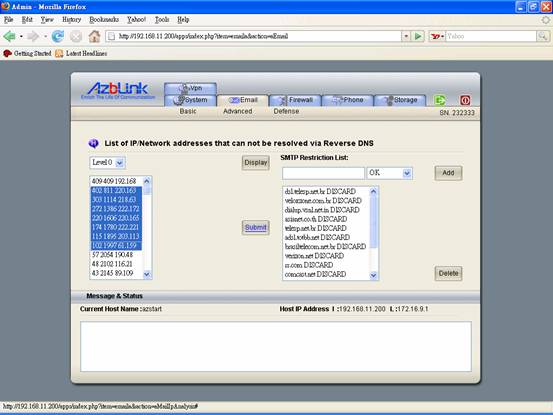
List of IP/Network Addresses that can not be resolved via Reverse DNS
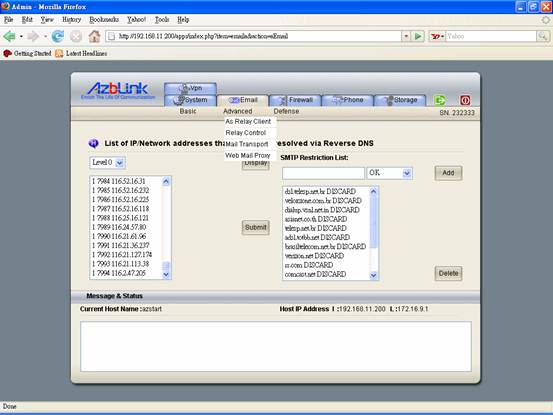
The functionality here is to provide analysis on those IP addresses that can not be resolved from reverse DNS lookup. The first column indicates the number of connections from that IP address or Network; it is also listed from the most to the fewest. The 2nd column is the accumulation from top. Thus, at the last row, you should see the total number on the 2nd column.
Please notice: if you select or type “208.168” to SMTP restriction list, it will match all the IP addresses from “208.168.*.*” . And SMTP connection includes all of the attempt on trying to connect to the email servers for sending and receiving emails. For the people sending out emails, it is also SMTP connection. So, you will see some “private IP addresses” shown in the list. Sometimes, it is not a healthy signal if you see some specific IP address from your local network to send out a lot of emails. It could imply that that machine is with virus. The SMTP restriction list will not block the SMTP connection when it uses user account and password for verification; to do that, it should be done on the firewall blacklist via “Border Control->Basic->Update Blocked Host” .
If processing spam emails with virus scan and spam tagging by analyzing the content does not occupy too much CPU time on the machine, it is not necessary to use those measures. However, under some circumstances, those measures can be quite useful to alleviate the system load. |
| TOP |
|