Basic Setting
Before we get into more details, the following list for “well-known” port numbers is provided for reference:
| Naming |
Destination port of IP header |
Note |
| ftp-data |
TCP 20 |
ftp is a kind of protocol used for file transfer across different machines. |
| ftp |
TCP 21 |
|
| Ssh |
TCP 22 |
ssh is used to for Remote Login Protocol from one machine to another machine. |
| telnet |
TCP 23 |
telnet is also for remote login from one server to another server. |
| Smtp |
TCP 25 |
smtp is used for mail clients to send emails or receiving emails from other mail servers |
| DNS server |
TCP 53/ UDP 53 |
|
| www ( http ) |
TCP 80 |
|
| pop3 |
TCP 110 |
pop3 is used by mail clients to transfer received mails from mail server |
| netbios-ns |
TCP 137/UDP 137 |
NetBios name service
NetBios is used for File Folder Sharing between Microsoft Windows hosts or Samba servers. |
| netbios-dgm |
TCP 138/UDP 138 |
NetBios datagram service |
| netbios-ssn |
TCP 139/UDP 139 |
NetBios session service |
| imap3 |
TCP 220 |
|
| https |
TCP 443 |
http over SSL ( secured socket layer ) |
| Imaps |
TCP 993 |
Imap over SSL |
| pop3s |
TCP 995 |
Pop3 over SSL |
Azblink Technology packages are using the following ports for Web-based Applications:
TCP 80
TCP 443
TCP 8080
TCP 8081 ( Web mail )
And the following port for VPN:
UDP 1194 ( OpenVPN )
And
UDP 4569 ( IAX for VoIP )
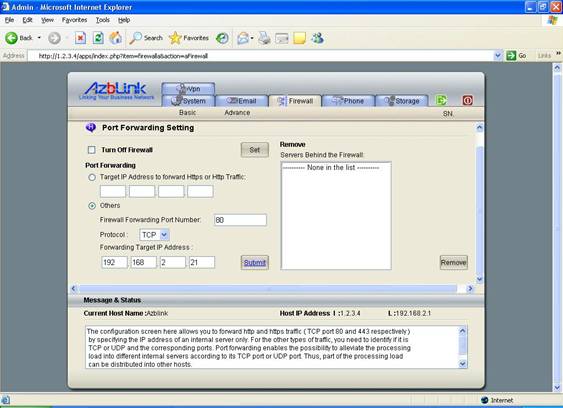
Port Forwarding
Conceptually, Port Forwarding is to forward the traffic arriving at a specific port of the firewall to another server that is inside the firewall. And the corresponding server inside the firewall processes the request and returns the response to the host that sends out the requests. Take http and https traffic as an example, they are of TCP port 80 and 443 respectively. If we activate port forwarding at firewall to forward all the traffic of TCP port 80 and 443 to an internal server A, the server A will handle all the request of TCP port 80 and 443 and entertains the http and https traffic by sending the corresponding html pages back to where http or https request is issued.
The operation principle of port forwarding is: the firewall will perform DNAT ( Destination Network Address Translation ) on the incoming traffic for the associated port(s) by replacing the original destination IP address to new destination IP address in IP header of each packet. So, the traffic arriving at a specific port of firewall will be forwarded to an internal server. When the internal server processes this “forwarded request”, the return response from the internal server to the outside host will be passing firewall at first. The firewall will perform SNAT ( Source Network Address Translation ) on each outgoing packet on Internet Interface eth0 by replacing the source IP address in the IP header.
Please notice that you do not have to explicitly specify any SNAT rules to change source IP address. The firewall will take care of that automatically by replacing each outgoing packets with its IP address of Internet interface eth0. Furthermore, for packets outgoing from eth1, it will use the IP address of eth1. It is “symmetrical” on both directions. And it will keep its own mapping while some response packets back by directing them to the original sender.
The configuration screen here allows you to forward http and https traffic ( TCP port 80 and 443 respectively ) by specifying the IP address of an internal server only. For the other types of traffic, you need to identify if it is TCP or UDP and the corresponding ports .
Port forwarding enables the possibility to alleviate the processing load into different internal servers according to its TCP port or UDP port. Thus, part of the processing load can be distributed into other hosts.

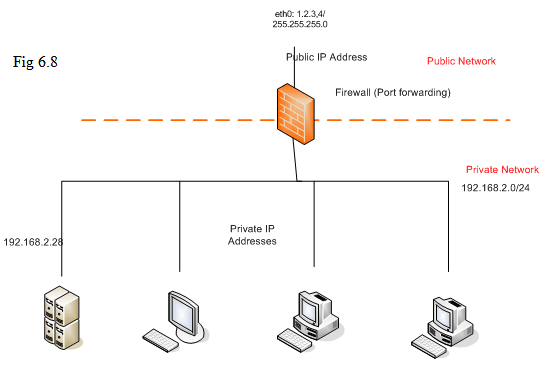
Let’s use a simple example to explain how to use this feature. Assume the firewall with public IP address 1.2.3.4 on its Internet interface eth0 and private IP address 192.168.2.1 on its LAN interface eth1. There is another server 192.168.2.21 inside the firewall. What we are trying to do is: if there is an HTTP request coming from Internet side with destination IP 1.2.3.4, we would like use the server 192.168.2.21 to handle the http traffic ( TCP port 80 ) arriving at the IP address 1.2.3.4 . In this case, we only need to use port forwarding by specifying internal server’s IP address 192.168.2.21 so that this internal server will handle this type of traffic.
However, once you do that, all the http requests originated outside firewall with destination IP address 1.2.3.4 will be forwarded into the internal server. That means all the http users outside the firewall can not access the html pages located on the firewall. The html pages they actually have seen are located in the internal server with IP address 192.168.2.21.
The description above is for the viewers outside the firewall. If viewers inside the firewall, the best way to access html pages on the firewall is to use IP address 192.168.2.1 which is the IP address of LAN interface of the firewall.
What if the users in LAN are using the IP address 1.2.3.4 for their http requests? The answer is: if the feature designated as LAN-NET Loopback in the following section is not turned on, they will get the html pages on firewall without being forwarded to the other server. However, for simplicity’s sake, it is suggested using IP address of LAN interface to avoid confusion for the admin users inside firewall to configure the firewall.
Another important characteristics of the port forwarding feature here is that: in the IP header of forwarded packets from the firewall, the source IP address will be labeled as the IP address of LAN interface of the firewall even though the packets are originated from outside and forwarded by the firewall. So, the internal server will not be able to know the packets are from outside in IP layer.

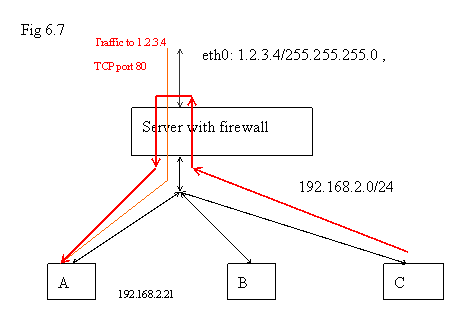
For example, in the diagram above, host D outside firewall sends packets to firewall and the firewall forwards the traffic to an internal server A. From A, the source IP address of IP header in those forwarded packets will be shown as “192.168.2.1” automatically. This is to enforce that the returned packets from A will go from firewall back to the outside host D. So, once you open the ports on firewall and forward the associating traffic to an internal server, the firewall will conceal all the information from IP layer. If you want to add more protection on A for this kind of traffic, the logic has to be done in application layer.
LAN-NET Loopback
While port forwarding is set to go in the previous configuration screen, the firewall forwards the traffic from outside to a server located inside firewall. But for the traffic originated inside the other hosts, if the IP address of eth0 of firewall is used, the firewall will not forward this kind of traffic to the internal server even if port forwarding is turned on. If you want loopback traffic originating inside the firewall is forwarded to the internal server as previous described, you should come to this configuration menu.

Let’s continue the scenario described above. A firewall with public IP address 1.2.3.4 on its Internet interface eth0, and private IP address 192.168.1.1 on its LAN interface eth1. There is another server with IP address 192.168.1.21 and it is located inside the firewall. Assume “port forwarding” is turned on to forward the traffic arriving at eth0 with destination IP 1.2.3.4 and TCP port 80 to 192.168.1.21. Let’s consider a further step: what if a PC ( with IP address 192.168.1.100 ) inside the firewall is trying to use http://1.2.3.4/, does the PC user actually see the html pages located on 1.2.3.4 or 192.168.1.21 ?
For the PC stations outside the firewall, we have no question about that – the html pages on 192.168.1.21 will be seen – that is what port forwarding is designed for. But this case is that the user is inside the firewall. If you want http://1.2.3.4/ to be forwarded to 192.168.1.21 for users inside the firewall, then LAN-NET feature shall be specified along with port forwarding.
To let this LAN-NET loopback feature put into effect; you need to reboot the host after the configuration setting is done. And it is reminded that this feature has to be used with port forwarding together.
Example: Port forwarding and LAN-NET loopback
Let’s use an example on how to configure the system we mentioned above.
The diagram below shows the traffic to the port 80 on the outside interface of the firewall will be forwarded into an internal server with IP address 192.168.2.21 . The local network is 192.168.2.0/24 ( it means every machine is with the IP address like 192.168.2.* ).
If you only want to forward the traffic for TCP port 80, in Port Forwarding Screen, you can set
Border Control Forwarding Port Number: 80
Protocol: TCP
Forwarding Target IP Address: 192.168.1.21
And press “Submit” button. And let’s wait until we finish the setting of LAN-NET loopback to reboot the machine.
On LAN-Net Loopback screen, do the following setting:
Source Network in LAN: 192.168.2.0/24
IP of Original Destination outside: 1.2.3.4
Protocol: TCP
Port Number: 80
New Destination IP in LAN: 192.168.2.21
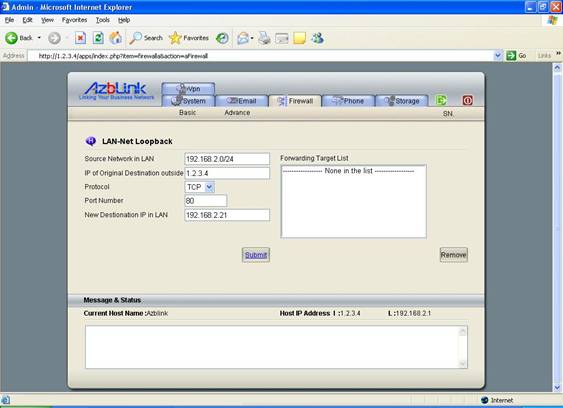
And hit the “Submit” button to wait until those changes are submitted. And then, reboot the machine by clicking the icon on the right corner above . Sometimes, you might also reboot your PC if you have existing connection on those machines to clean up those existing connections.
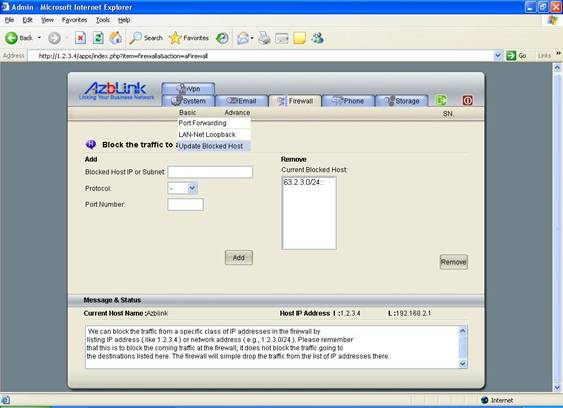
Blocked hosts
We can block the traffic from a specific class of IP addresses in the firewall by listing IP address ( like 1.2.3.4 ) or network address ( e.g., 1.2.3.0/24 ). Please remember that this is to block the coming traffic at the firewall; it does not block the traffic going to the destinations listed here. Only the source IP address will be checked against on the blocked list. So, the firewall will simple drop the traffic from the list of IP addresses there.
However, you can use the characteristics that some of the network functions are composed of the “2-way” traffic. For example, you send a message to a server and the server gives you response. So, if you block the traffic in one direction, that associated network function would not be working.
Please notice that the feature here is to block the traffic originated in the specified host or network at the firewall. It does not prevent the traffic originated inside the firewall to arrive that host or network. In other words, it is to block the arriving traffic. Usually, this is used to stop malicious attack from a specific host. In the case of the 2-way traffic for a network protocol, it can prevent the users from accessing that specified host by stopping its incoming traffic.
To clarify one thing here: the function describe here not only block the hosts Outside Border Control to arrive at the firewall, but also block the hosts inside the firewall if you put those hosts’ IP addresses into the list.
It is advised to use the methods introduced in the following section to prevent a specific type of outgoing traffic from LAN to Internet.
Example: To block some outside hosts
Let’s use the following diagram as an example. The network inside the firewall is 192.168.2.0/24 . But we want to block any traffic from 63.2.3.0/24 . So, in that blocked host screen, we can have setting as follows:
Blocked Host IP or Subnet: 63.2.3.0/24
( leaving Protocol and Port number in blank and submit the result )
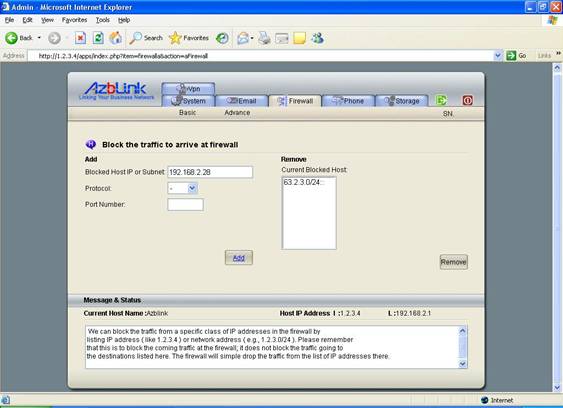
Example: To block an internal host inside firewall
You can also block a host inside the firewall. In the diagram above, if we want to block host A, and its IP address is 192.168.2.28. We can set as follows in that blocked host screen:
Blocked Host IP or Subnet: 192.168.2.28
So, anything coming from host A will be ignored by the firewall.
 |