• Quick Installation Guide
  • Step by Step
  • Admin User Guide
01. Introduction
  • Presence of the Machine
02. Hardware Requirement
03. Acquire the Software
04. System Configuration
05. Recover System via RAID
06. FAQ

The Presence of the Running Machine on the Internet

Everything has a start, and has an end.

Deploying a server over the Internet is different from setting up a local server without being revealed to outside people. For a server to be unknown on the Internet by fully-qualified hostname, it requires some registration processes. Furthermore, since the server is known to the public, some security measures should have been taken to avoid the abuse of the server.

This package includes basic elements for network operation, for example, DNS, FTP, firewall, backup storage server, VPN (Virtual Private Network) and Email .

We start from the introduction on Domain name registration with the following diagram:

1. Purchase domain name from the “vendor for domain name registration”

The “Domain Name Registration Vendor” usually will provide a Web interface for you to query your desired domain name. You may find some of the domain names you like have been acquired by other people. It is necessary for you need to find a domain name that is not being occupied. And then make the purchase of the domain name from the “Domain Name Registration Vendor” to complete this step.

2. Purchase Internet bandwidth and obtain “static” IP addresses from your local ISP (internet service provider).

Usually, the ISP will give you a set of IP addresses that may include a list of public IP addresses, the netmask, and the default Gateway. This IP information will be used when you install the software and configure your server. You shall keep the information in a safe place once you obtain that from your ISP.

3. Find a legitimate “DNS host provider”

It is to host your domain name (which you get from step 2) and the associated static IP address (which you get from step 3) record so that everybody on Internet can use your domain name to reach your server. Usually, the “DNS host provider” will provide a Web interface to allow you to input your domain name and the mapped IP address record into their hosted server. This step is completed after you have entered the data into the web page.

4. Update the record at the “Domain Name Registration Vendor” server with the IP addresses of the “DNS host provider”.

At this step, you need to access the website provided by “Domain Name Registration Vendor”. If you do not know the DNS server’s IP addresses of your “DNS host provider”, you can do as follows at your Windows command prompt (the command prompt is reached through Start > Run > cmd), issue the command

  C:\>nslookup DNS-server- name-from-your-provider

The system will respond with the IP address of your “DNS host provider”. Usually, you need to find two IP addresses of the two DNS servers provided by “DNS host provider” (one is called primary DNS host server, the other is secondary DNS host server). The two IP addresses will be entered into the record in the place of “Domain Name Registration Vendor”. We suggest using primary DNS server and secondary server from different places. The Azblink server package also provides DNS server. But to allow people all over the world can query your domain, you should have your domain name placed in different DNS servers to alleviate the load.

5. Wait until it is in effect.

In general, it needs 24 hours to 72 hours to have your domain name record of the server populated across the world so that people can use domain name to access your server.
Those are the general steps as long as you want to have your own private server(s) on Internet.

TOP

Basic Web Setting

After the system installation be finished, take the CD out, reboot the machine, and then start the basic network setting for the system.

There are two modes to configure the host, one is console mode on the local host, and the other is Web interface mode on Client. You can choose the one you like or just by the network environment of that time.

Console Mode --- configure on local host

A. Input account and password to login into console configuration interface.

 login:reset
 Password:root123

B. You will see 7 options after login in

 1. IP Address:192.168.19.185
 2. Netmask:255.255.255.0
 3. Default Gateway:192.168.19.1
 4. Save and Reboot
 5. Reset to CD setting (DHCP) and Reboot
 6. View Current Active Values
 7. Exit without Saveing Changes

C. Is there any fixed ip ready for configuration?

  Yes, type fixed IP address, Netmask and Default Gateway into option 1.2.3. severally. You can use up
  and down arrow to choose the option who needs edit, and then press enter to configure. After option 1.2.3
  be correctly configured, you can use option 4 to save these changes and reboot the machine. (If you have
  no idea about the Netmask and Default Gateway, you can just refer to the Completion List provided by your
  ISP.)

  No, if there is a DHCP server providing the IP assignment services in your network, you can just use option6
  to check the IP address assigned by the system. After checking eth0, please write down the IP address, and
  remember to use option 7 to quit the Console interface.

D. By the IP address you set or the one obtained from DHCP, you can view the configuration page of the
   system host via Web browser on remote Client.

※ DHCP server exists in your network, but if you find eth0 shown as IP 1.2.3.4 when you check current system value, please check if your network cables plug into wrong place (eh0 and eth1 may been exchanged), or if there are some problems on other equipments. (Refer to Q&A in the manual)


Web interface Mode --- configure at sub-network

A. Is the host, which you installed system on, connected by other hosts?

  Yes, please confirm the host is the only DHCP sever (that is to say the network should not have other
  DHCP servers, e.g. IP distributor), and then start from C.

  No, please complete basic network configuration according to B’s instruction.

B. A network cable makes host’s eth1 port and the Hub connected. And use another cable to connect to
  Hub, let the other end of this cable link to a common Client computer.

C. Choose one Client computer from the sub-network which connected to the system host.

D. Open command prompt on the Client (suppose it’s a Windows machine), type “ipconfig” and then press
 “Enter” button, check whether the Default Gateway is 172.16.9.1 or not?

  Yes, just close the command prompt, enter into next step.

  No, type “ipconfig/release” to release the old IP in your computer, and then type “ipconfig/renew” to get
  new assigned IP.
  (If you are still unable to obtain new IP, please check if the network has other DHCP sever or not, or maybe
  TCP/IP of this Client does not use the mode of “Obtain an IP Address Automatically”.)

E. Open your Browser, and type http://172.16.9.1 at the address bar to link. When you visit the page at the
  first time, you will see 4 items;

  Host Name:Please set Host Name for this host.
  Admin Password:Default password is admin123.
  New Admin Password:Please set new password.
  Confirm Password:Please confirm your new password.

F. After you enter into system page, go to System>>Network, choose Internet or PPPoE depending on the
 situation.

  Choose Internet. At the Internet Interface, mostly, you should set the values for IP address / Netmask /
  Default Gateway and then submit, restart your machine and you will find it already connected to Internet.

  Choose PPPoE. If you use PPPoE, remember to check the checkbox of “Turn on PPPoE”. Fill in the account
  and password provided by ISP and submit, reboot your computer, then you can connect to the network.
  (Please refer to the sections of Configuration and Q&A in Quick Installation Guide if you have any questions.)

TOP

Locale

There are 3 major items on this screen: Time Zone, Language Setting, and Local time setting.  In the selection items of Time Zone, it provides many different ways to specify the time zone area where the server is used, like area/country or the hours apart from GMT, … and so on.
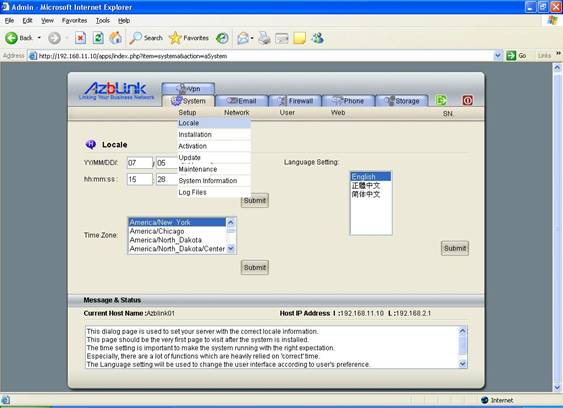
For Local time setting, it is very important to know that once you modify the system time improperly, some of the functions in the server using the timestamp may behave abnormally. For example, file A shall be created before file B and some programs might check the timestamp of file A is “earlier” than file B. Unfortunately, if you modify the time of the server such that file B is created “earlier” than file A, then the system might behave not as expected.

Language setting here is to specify the language used in the display text. In other words, if you choose a language and set it here, next time when any user uses the system, he/she will see the operation menus displayed in the language you specified. However, each user still has the chance to change the display text at the moment of login to the server.

Installation

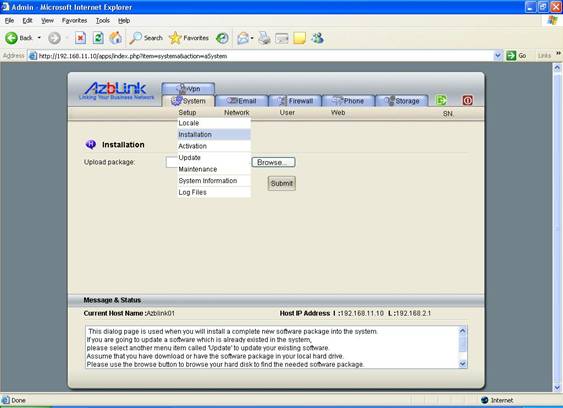
If necessary, some of the software packages provided by Azblink can be installed via this place. As for “Service Vendor Number”, that is used to identify the registered support team to install this software for you so that we can contact them for future support. If you install this software by yourself, that information will not be needed.

Activation

This screen is to allow you to place the correct license file(s) into the system. Once you acquire the license file, all the functionalities will be turned on. The Activation Code is 40-digit code that is divided into 4 groups, i.e., each group is with 10-digit number. When you want to purchase software license, you need to have this Activation Code ready.
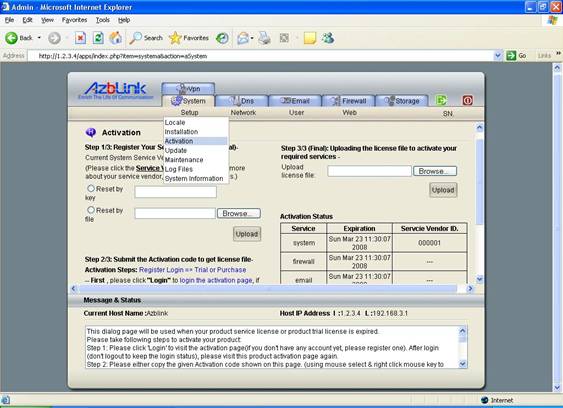


The Activation Code is changing with time. Thus, every time when you view this page, you will see different codes shown on the screen. It contains some information that we would like to keep a record on the system.

You can just click the Azblink URL on the page, the URL will bring you to visit Azblink website. On the web, you will be required to enter your registered account and password, and then you will be able to select what product and combination that you are interesting to activate in this host. After the selection, Azblink will prompt you with the license file that you can download and upload to this host to complete the whole activation process.

Once the permanent license is installed, you will find out a SN number shown on the right corner of the top.

Update

Progress is made via continuous improvement. Some of the enhancements of the software can be updated through this screen and loaded into the system.

Maintenance

This is to allow the administrator to do backup of the system settings when the machine is configured completely. It also restores the previous setting based on the previous backup setting files.

Those system setting files will be compressed and stored according to their dates.
The setting files include network configuration, firewall rules, user account and password. When you make mistakes by entering wrong data into the system, you will have the chance to restore your old setting if you can reach this Web interface.

  “Restore” means you can restore server setting, firewall setting, furthermore, the user registration record. However, “admin” and “root” user will not be restored to default value to prevent administration login failure.
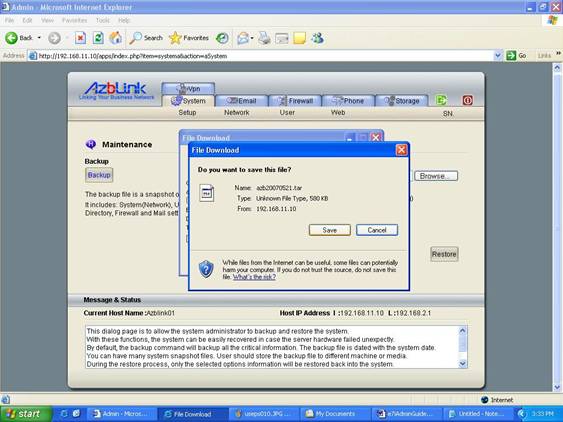


When you press the backup button, the system will prompt up a small window to allow you to select the location to backup the system setting data.

When you will restore the system configuration, you can browse to find the previous back up files, select the wanted items and press restore button to restore the previous setting. The previous setting will overwrite the current setting. However, the “admin” and “root” password will not be changed.  This is to make sure that you will be able to enter the system by using current admin password.
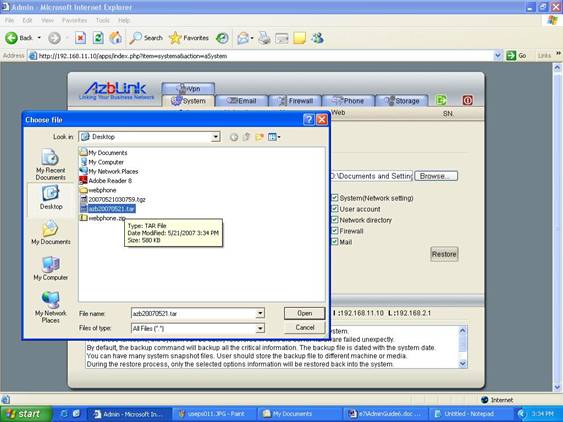


You may notice that the previous user account and password is valid but you can not use the view account to view those account. You can just use the System/ User /Reset account to change the password; it is readable from the View account page.

System Information

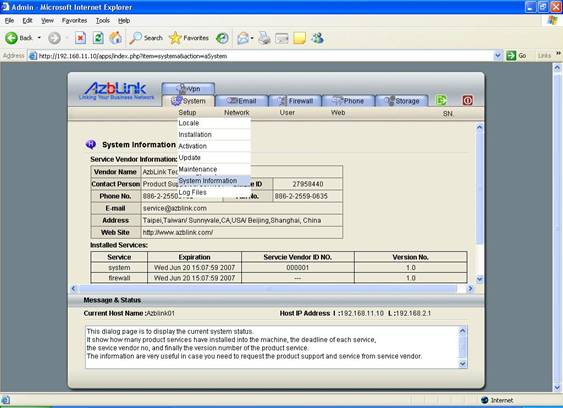
The page displays the information like who is the service vendor of your system. From the information, you will be able to click the URL to reach to your service vendor website, or use the provided phone number for further support and service.

The expiration date, service vendor number and version number of each product are also listed on this page. It is used to track the software so that bug fix and report can be done more efficiently.

Log Files

The log files record major system activities and events.  To protect the system, it only shows the last 1000 lines of that file. For more detailed information, you should use console instead of this web interface to check other associated log files.

TOP