Overview
The term “Email Authentication” we use here is to refer all of the methods for checking the validity of Email servers; it is mainly referring to authenticate sender’s domain name via DNS; it is different from Email content filtering or authors’ digital signatures. Here we only give a brief introduction of those Email Authentication schemes so that people can establish enough knowledge to use those features provided on the Email solutions. However, for more detailed information, please check their respective specification documentation.
The schemes SPF( Sender Policy Framework), SenderID, DomainKeys, and DKIM (DomainKeys Identified Mail) are designed to verify sender’s domain name associated with emails. The simplest method for Email authentication scheme is “reverse DNS lookup” plus “forward DNS lookup” to check if the IP addresses of incoming emails are matched with those domain names. However, simple “reverse DNS lookup” and “forward DNS lookup” are not flexible enough; they are not designed for Email authentication originally. Why those verification schemes are proposed can date back to the protocol design of SMTP (Simple Mail Transfer Protocol) and the prevailing email forgery by faking a domain name to send out emails. Thus, Email authentication schemes are come up to resolve those issues.
Operation of DomainKeys and DKIM
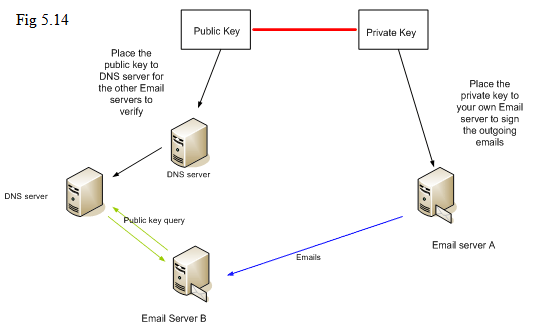
The principles of DomainKeys and DKIM are similar. DomainKey is originally proposed by Yahoo. Later on, people adopt that concept and propose DKIM. The idea behind is: generating the pair public key and private key. The private key is used by “sender machine” to put a signature on the outgoing emails; when the emails arrive at the “receiver machine”, the receiver machine uses the public key by issuing an query from DNS server to verify the validity of the signatures.
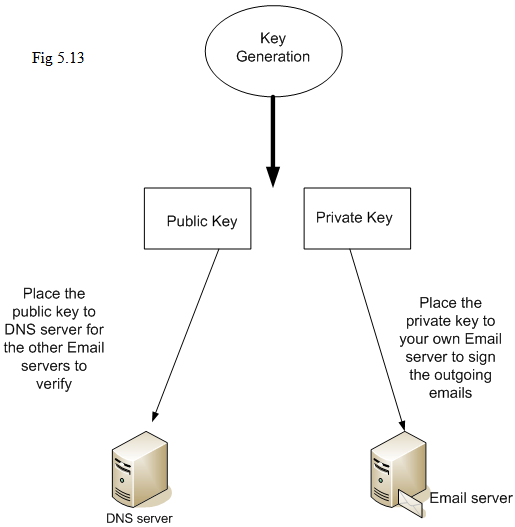
The philosophy of this mechanism is: the Public Key is used for “verifying” the signature and Private Key is used for “signing” the signatures; furthermore, people can not guess “Private Key” from “Public Key”. So, when the signature does not pass the verification, it could imply the email is sent out without going through the correct signing process; it could be a forgery email.
-----BEGIN RSA PRIVATE KEY-----
MIICXQIBAAKBgQC+2og5sex8zeXAZonl2/vnzVjsUHLKUv0DSoZeWgpQrB5FQgf7Ttd18w1FT
jAmv8hK4GtYOSRtoBZFUCVMwmBB9Tkx60EHckp+Fb494OZYbenL8hJL7XLuS5ux4tokwGW
//3dBUxIHnTxIRt+aJ7Ik96GIr90lUt0oqe3FbAE6/wIDAQABAoGADpcCJvb1Dy1mTOkJzaqdfUD
zdU1JGTJy6Rd/YiMb+sLNpZnApnOGgRvNfejWQYATvbWePyZPJJpCWZYg49dQKFiS8/wA7fd
qodAlyAOS5vhFmUBdcJh45mbHLRElwVfDGIx1tkFlwxGZLvIUP08Q2i7mneO9i421FOKLTEl3p
rECQQD78J1N5GcnUor3yt8diBJOyJm1UPG31bUtTidXw980tjlnIlcZntIgg0q9VIYooJZhjs0O9aeA
5aw1TZBW5N6LAkEAwe3njHPtoyH9zsUROsnBg48UtGQZ1KgC3nPFL+LxxRjfoU/Ew54bdcKr0
Ye8p3qM3IwZ1aqES/SyVO+SJL/33QJBAPkYXJ9v7WGephH7fn/3UoqcogT4hBWL8bdap2GKIz0
90iGbfVyyf/Vvek0Zrg+rPyQ0CaD512SFMK//AXA4l6MCQFu+TLhpb5apUgUrvYbuQ5oValocsQ
uloBXU9wg8eNwhdEpADnnsplkDi31Ilbs1gsYjkWU/ke7NCECeRakVGBECQQD4Cjs2CWSZotij
yPab/dG0ynP7Wsdw3EcHlml1kO2JHdwYOD0DfUetikKhBDq5f5arkgBSzCpQjmf7CVmmdy93
-----END RSA PRIVATE KEY-----
-----BEGIN PUBLIC KEY-----
MIGfMA0GCSqGSIb3DQEBAQUAA4GNADCBiQKBgQC+2og5sex8zeXAZonl2/vnzVjsUHLKU
v0DSoZeWgpQrB5FQgf7Ttd18w1FTjAmv8hK4GtYOSRtoBZFUCVMwmBB9Tkx60EHckp+Fb4
94OZYbenL8hJL7XLuS5ux4tokwGW//3dBUxIHnTxIRt+aJ7Ik96GIr90lUt0oqe3FbAE6/wIDAQAB
-----END PUBLIC KEY-----
Public key shall be published in DNS. It is with the following format in TXT record of DNS:
selector._domainkey.example.com. IN TXT "g=*; k=rsa; p=MIGf...DAQAB "
where “selector” is the Selector used by DKIM or DomainKeys indicated in the outgoing emails in the signatures. And the part “_domainkey” shall be kept as it is. Usually, if you give full name by adding domain names in DNS records, it usually ask you to put a trailing dot. The public key is placed at the place “p=…. “ . The record shows it is using RSA algorithm. If you just want to test it, you can add “t=y” in the record.
When an email arrives at a receiver machine, it needs to know which public key to use. For example, if each of your machines is using different key to sign the outgoing emails, you might have multiple public keys in DNS. By specifying different selectors, the receiver machine will know which public key to query from DNS server:
beta1._domainkey.example.com. IN TXT "g=*; k=rsa; p=MIGf...DAQAB "
beta2._domainkey.example.com. IN TXT "g=*; k=rsa; p=MIGf...FAFAB "
If you can see the Email Headers on a receiver machine, you might find out the header would contain the field “DKIM-Signature” or “DomainKey-Signature”. This means that email was signed by “DKIM” or “DomainKey”. And the authentication result will be placed at the field “Authentication-Results”.
Operation of SPF and SenderID
SPF and SenderID are different standards. Originally, SenderID was proposed by Microsoft and later it was forced by IETF’s suggestion to be compliant with SPF. Thus, to play safe, we suggest only placing SPF record in DNS. In DNS, the SPF record should look like
mydomain.com. IN TXT "v=spf1 a +mx +ip4:130.207.0.0/16 -all"
Please note that “a” or “mx” here means “A record” and “MX record” in DNS respectively. For those “+” and “-“, they are referred as “qualifier” in SPF. They have the following meaning:
+ : PASS result, this can be omitted, +mx is the same as mx.
? : NEUTRAL result interpreted like NONE (no policy).
~ : SOFTFAIL, a debugging aid between NEUTRAL and FAIL.
- : FAIL, the mail should be rejected
Each line shall be read from left to right; if the previous condition matches, the rest of the conditions will be ignored.
SenderID is with a few addition on SPF, it replaces “v=spf1” with either one of the following:
1. spf2.0/mfrom
2. spf2.0/mfrom,pra
3. spf2.0/pra,mfrom
4. spf2.0/pra
However, when it sees “v=spf1”, it needs to fall back to SPF.
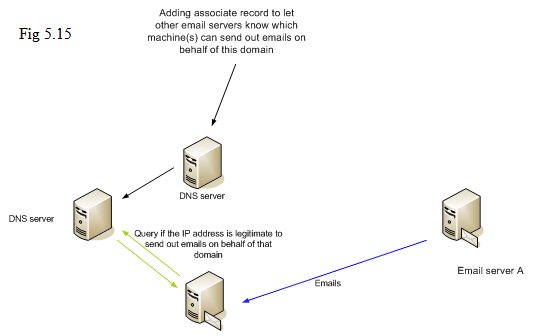
The operation of SPF and SenderID is indicated in the diagram above. A DNS record is placed on the DNS server associated with that domain name to indicate which machine is legitimate to send out emails on behalf of that domain. When an email arrives at a machine, the receiver machine might issue a query to DNS server to know if the IP address is allowed to send out emails from that domain. If it does not match the policy specified in DNS record, it implies that this is a forgery email.
After familiar with the work flow above, we start to put them into action.
Key Generation for DKIM and DomainKey
The Key Generation Process can be done via navigating through “Email->Authentication->Key Generation”:
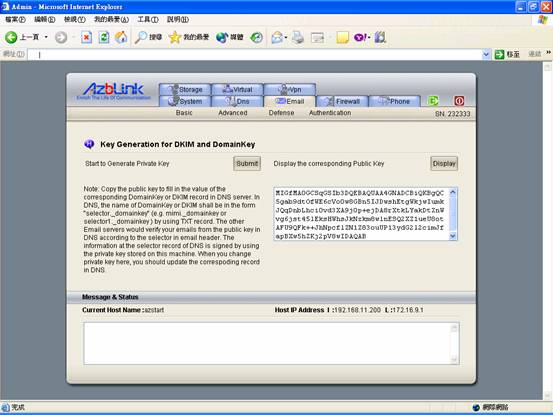
By pressing the “Submit” button, they system starts to generate the pair Private Key and Public Key for the use of DKIM or DomainKey. Private Key will not be displayed on Web UI for security sake. And Public Key can be displayed by pressing “Display” button on the right. Later on, the public key shall be used to fill in the record in DNS server.
DKIM/DomainKey Signing and Verifying
To sign the outgoing emails or verifying incoming emails on DomainKey or DKIM signatures, the following setting should also be set in advance:
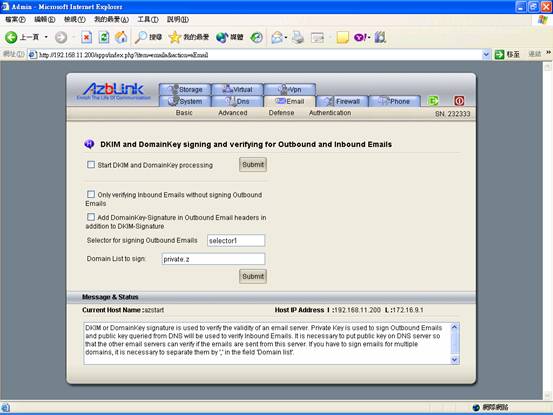
It can be found via “Email->Authentication->DKIM & DomainKey”. And Selector and domain name shall be entered as well. The email system will put the name of Selector on DKIM and DomainKey signatures so that the other end can verify the received emails.
Selector for signing Outbound Emails: selector1
Domain List to sign: mydomain.com
Please note that the system will only sign the DKIM/DomainKey signatures for the domain in the list with the selector label entered here. In other words, it will not sign the domain that is not on the list. Thus, if you use this machine to send out emails by using different domain names intermittently, you should choose the domains you want to sign and enter them into the field “Domain List to sign” by separating them in “,” :
Selector for signing Outbound Emails: selector1
Domain List to sign: mydomain.com,mydomain2.com,mydomain3.com
If you want to sign the outbound emails, do not start DKIM/DomainKey processing until you fill in the associated DNS record. Even right after you fill in the corresponding DNS record, the DNS record will not populate around the world so quickly. Thus, you might expect some failure results in the authentication result on the other hand due to no record in DNS initially. By the time DNS record to be published into other DNS servers, those signatures can be correctly verified.
You can choose not to sign the outbound emails by letting the system only verifying the inbound emails only. It can be done by click the checkbox
“Only verifying Inbound Emails without signing Outbound Emails”
When you click this box, the rest of the options will be ignored. It only verifies the incoming emails without signing outgoing emails.
By default, the system will verify DKIM and DomainKey signatures on incoming emails and only sign DKIM signature for outgoing emails. You need to click those options on this configuration screen to change its behavior.
For example, to add DomainKey signature, you need to click the box
-“Add DomainKey-Signature in Outbound Email headers in addition to DKIM-Signature”
Do not forget to add the associated DNS record if you want to sign the outgoing Emails. We will mention it later if you use the DNS server on this machine as well.
SID (SenderID) and SPF
As we mention previously, the verification will be done on Email server for SenderID and SPF. For the other end to know which IP address(es) can send out Emails on behalf of your domain, you need to put the associated records on DNS server.
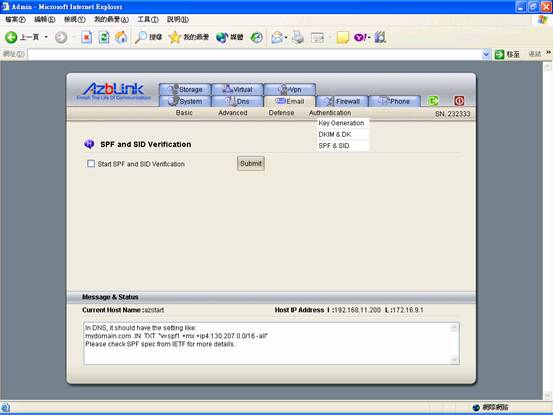
To turn on SPF and SID verification, just go to “Email->Authentication->SPF & SID” to submit the request.
The Corresponding DNS records for SPF, DKIM, and DomainKey
If you use Azblink’s DNS configuration system, you can do as the following steps indicated.
Navigating via “DNS->Domain Zone->Zones Manager” and click the domain you have created, you will find different items for DNS there. Press “SPF”, and you will find the following screen.
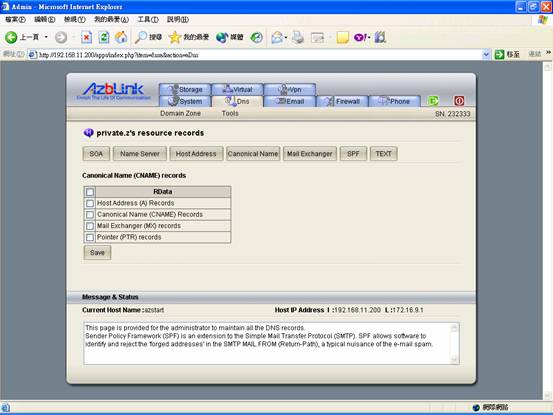
Just select the mechanism you want to have for SPF by clicking those checkboxes and it will generate the SPF record thereafter.
If you want to handle this in more sophisticated way, you can press “TEXT” to deal with TXT record directly:
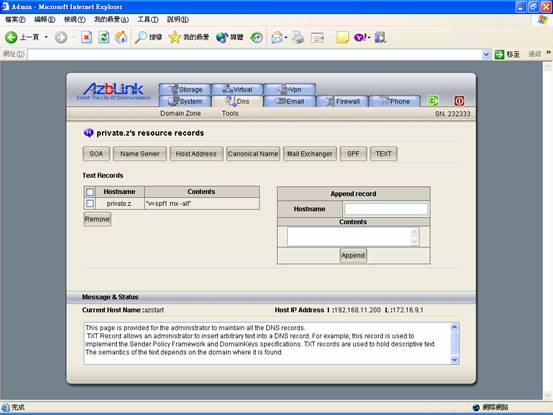
And it gives the flexibility to adjust your setting along with different requirements.
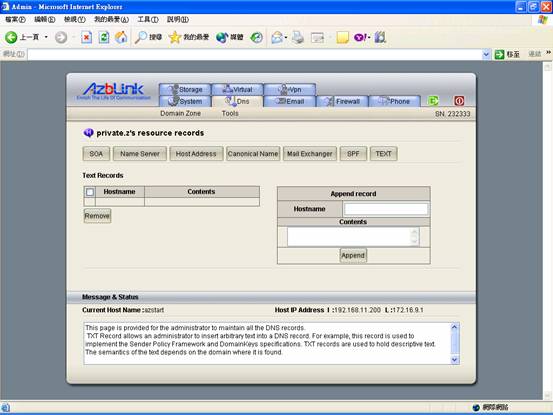
For DKIM and DomainKey, we deal with TXT record directly.
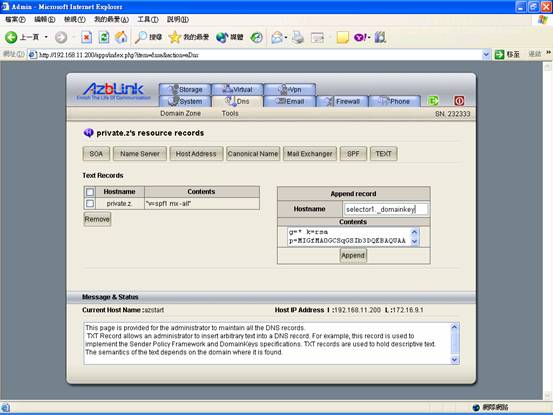
Remember the “selector” needs to match with the one you use for Email server, and the public key needs to be copied here. |