Motivation
Let’s start with the following scenario. Assume your office network is protected by a firewall with NAT ( Network Address Translation ). The internet access interface of the firewall is with public IP addresses; on its access of the local office network, private IP addresses ( 192.168.0.0/16, 172.16.0.0/12, 10.0.0.0/8 ) are used. This is a very typical case in the office. While the box firewall resides does not have the capability to install other software, usually, we put the application ( e.g. Mail server ) is a separate box and use “port forwarding” to forward the associated traffic from internet to this box.
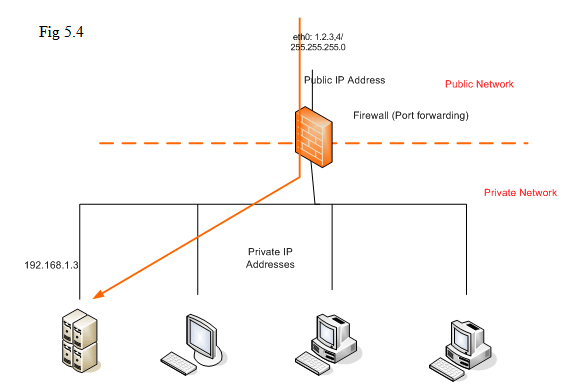
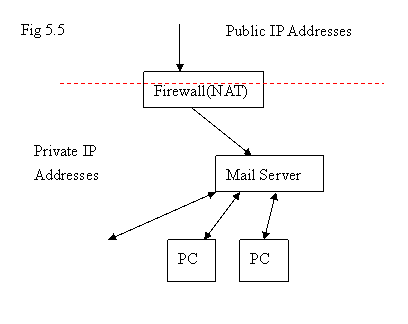
Since most of the firewalls earlier only support the manipulation of traffic up to the layer TCP/UDP/IP, it does not have processing logic on higher-layer application. In this case, the Mail Server in the diagram above usually accepts the traffic associated with TCP port 25 of a specific public IP address. The firewall just forwards the traffic with matched destination IP address of destination port TCP 25 to this Mail server; it does not process any email related protocols based on TCP port 25 ( known as SMTP ).
The scenario can work pretty well. But as time goes by, you have more and more users for that Mail Server. The response of that Mail Server turns out slower than before. Slower response of Mail Server could be due to network bandwidth issue, the processing power of Mail Server, or the storage space. Usually, the network bandwidth issue on the local office network needs to re-partition the subnets carefully and put different people into different subnets. If it happens to the bandwidth of the internet access, you might think to upgrade the internet access of your office. However, for pure email application for your office people, it would be more often to have the need to add more processing power or storage space for email application.
Simply replacing the existing Mail Server by using more powerful machine does not make sense because the current machine is not broken yet. It still functions; it just can not take more load. To protect the existing investment, it would be reasonable to add one more machine and let the two machines work together. We will elaborate more on the solutions for this kind of problems.
Let’s put more requirements on that: the firewall is only with 1 public IP address provided by ISP. And it is intended to add one more Email server in the office network inside the firewall. We just summarize the information as the following example:
-Domain name: zzzzzz.com ( let’s assume this is a legal domain name )
-Public IP address: 1.2.3.4
-Since there is no other public IP address provided, the MX record of public access DNS server can only be set to 1.2.3.4 .
-Private IP address of Mail server inside firewall: 172.16.1.210
- Port forwarding in firewall is turned on to forward the traffic with destination IP address 1.2.3.4 TCP port 25 to 172.16.1.210 .
With the existing information here, we will explore the possible solutions.
Possible Scalable Solutions
(Remember: Only 1 public IP address is available when thinking up solutions.)
Solution I: Email Alias ( + Internal DNS server )( Bad Solution )
Usually, “port forwarding” can only forward the traffic of specified IP address with TCP/UDP port only to one machine. In order to have emails distributed to several machines, we need processing logic in application layer ( on email protocols ).
Email Alias is one of the methods to forward an email arrived at a specific alias to one email account or many email accounts.
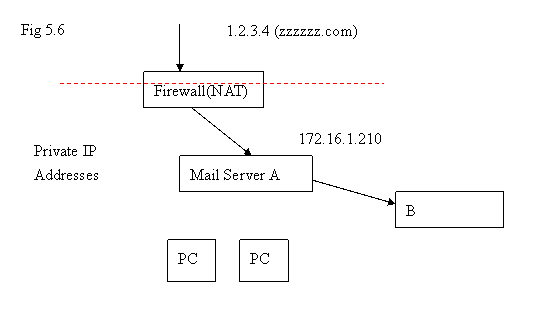
In Mail Server A, it might be possible to have n user email accounts already. Starting with (n+1)th user, the account is going to be added in Machine B. In Mail Server A, we need to have an alias ( for example, “user101” ) and this alias will have the following information:
Alias user101 at Mail Server A à user101 at machine B
Usually, it is just adding an email account to alias “user101” at Mail Server A. In old days, email accounts could be of the form user101@ipaddress. ( e.g: user101@172.16.1.211 ) . But nowadays, most of the email servers will not accept this kind of email account. Thus, at least, you should put an email address like user101@b.fakeddomain in the mail alias “user101” of Mail Server A. This “fakeddomain”(e.g.: private.z ) is something that can not be queried from the Internet DNS server; you only can put them into the DNS server for your private network.
It is not done yet. Machine B also needs to be configured to accept email address like user101@b.private.z .
However, all of the users should not be aware of things like “b.private.z”; they will use their emails like user101@zzzzzz.com to the users inside the company or other people’s email accounts on the internet.
Obviously, this is not a good solution; it involves with too many details and it is very difficult for maintenance. For example, how do the users in machine B send emails to Mail Server A ? Each of the two machines is Mail server and recognizes itself as “zzzzzz.com”. You might need to do similar things by adding the users in Mail Server A to the alias list in machine B.
The following solution is what we suggest by using our Enterprise Email Server.
(Remember: Only 1 public IP address is available when thinking up solutions.)
Solution II: (recommended solution)
In the following diagram, Mail Server A is Azblink Enterprise Email Transport server. We are going to add a new servers for HR department and Engineering department. The users at Mail Server A are with email account of the format user@zzzz.com, the users on Mail Server B are with email account of the form user@hr.zzzz.com , and users on Mail server C are with the format xxx@eng.zzzz.com.
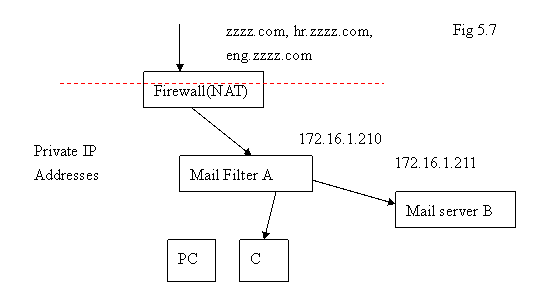
Outside the firewall, zzzz.com ( or mail.zzzz.com ), hr.zzzz.com, and eng.zzzz.com are pointing to the same IP address 1.2.3.4 . And the port forwarding on the firewall is set as previous. The newly-added server B for HR department is with private IP address 172.16.1.211 inside the firewall; mail server C for Engineering department is with IP address 172.16.1.222.
On machine B, the outgoing emails need to be configured as the address like user@hr.zzzzzz.com. This can be done by setting as follows in Azblink Enterprise Email server menu: Email->Basic->Domain/Host
Domain Name Specific for Sending Mail: hr.zzzz.com
Host Name Specific for Sending Emails: hr.zzzz.com
On machine A, it is
Domain Name Specific for Sending Mail: zzzz.com
Host Name Specific for Sending Emails: mail.zzzz.com
( if your original setting for mail server is as “mail.zzzz.com” in MX record of public DNS registry )
And you need to put all the host names or domain names that you allow this host to receive emails in the box “Hostname(s) or domain names to be used to receive emails”. It will receive emails with those domain names.
On machine C, it is
Domain Name Specific for Sending Mail: eng.zzzz.com
Host Name Specific for Sending Emails: eng.zzzz.com
It needs to do one more thing on machine A from Web management interface: Email->Advanced->Mail Transport:
Turn on “Transport to other host(s)”.
Add “Sub-domain” with “hr.zzzzzz.com” with private IP address “172.16.1.211” and “eng.zzzz.com” with IP address 172.16.1.222 into the list. Then all the emails with the form XXX@hr.zzzz.com will reach machine A first, and then, machine A will transport those emails to machine B. Similarly for those emails with address XXX@eng.zzzzz.com will be transported to machine C.
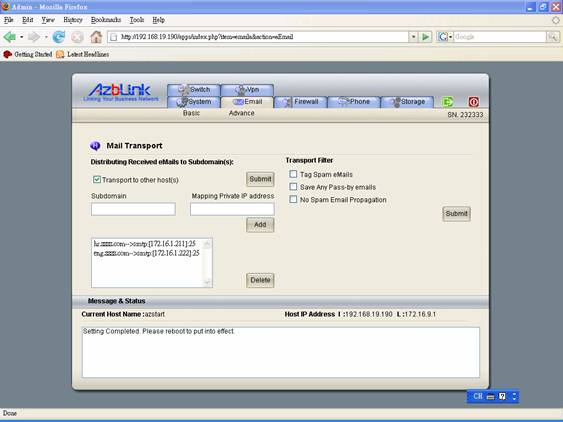
The benefit of this configuration is: when you add new users on machine B for HR department, you do not have to go back to machine A to add anything.
If you want to have another new server for Sales Department with email address like XXX@sale.zzzz.com, you can just following the similar way to do it. Remember: this is under the condition that you only have one public IP address so that we have to distribute emails in this way.
(Remember: Only 1 public IP address is available when thinking up solutions.)
At the admin menu Email->Advanced->Mail Transport, there are some settings for Transport filter. It can be used to save emails being “received” or “sent via relay”. Spam email tagging and filtering to prevent from the spam email being propagated to the next mail hop are also there. “Saved Pass-by Emails” can be found under the directory /home/filter of the server where the Web UI is associated.
Mail Filter – spam tagging, filtering, or saving pass-by emails
Deploy a Mail Transport Filter in front of existing mail server
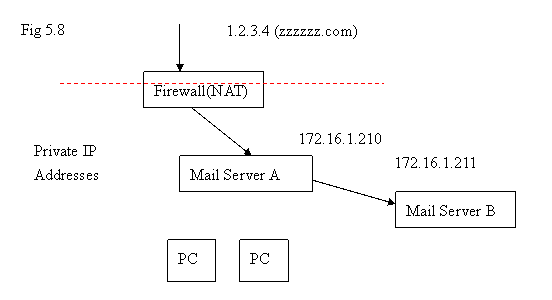
Azblink Enterprise Mail Server can be working as an independent mail filter for Spam Mail filtering and Virus Scan by deploying it along with other mail server. For example, in the following diagram, all the inbound emails will arrive at Mail Server A at first. And then, those inbound emails will be delivered to the final destination Mail Server B. In this case, A is acting a pure mail filter because it is not the “final destination” of any emails.
Assume that machine B is your “original mail server” without the functionalities for handling Spam Mails or Virus Scan; machine A can be introduced for handling the tasks for Virus Scan on emails or filtering Spam mails only. The users still interact with machine B directly for sending or receiving emails as usual and let the machine A handle Spam Filtering and Virus Scan for emails.
Assume that machine B is your “original mail server” without the functionalities for handling Spam Mails or Virus Scan, machine A can be introduced for handling the tasks for Virus Scan on emails or filtering Spam mails only. The users still interact with machine B directly for sending or receiving emails as usual and let the machine A handle Spam Filtering and Virus Scan for emails.
Mail Transport Filter for Multiple Mail Servers
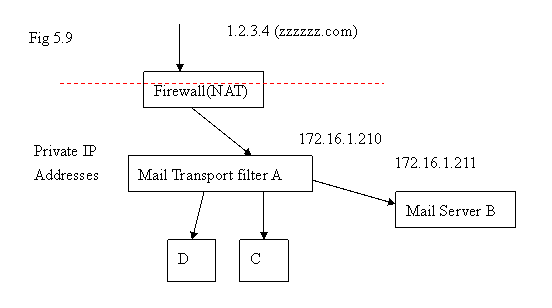
In the diagram above, B, C, and D are mail servers. Letting A handle Spam Mail Filtering/Tagging seems a good choice. But Virus scanning shall be done on B, C, D to let the processing load be distributed to multiple servers. There is no definite rule about which function shall be done in a specific place – it depends on the characteristics of the processing power and arrival rate of emails. Usually, when one task can not be done in one server, we distribute that task to other machines and let multiple machines handle that task.
For example, if you turn on Spam Mail Filtering on and Virus Scanning on machine A, it might be working well when the volume of emails is light. However, it might take very long time to process the incoming emails if the arrival rate of emails is very high. So, it is not appropriate to handle everything on A; it is necessary to distribute the processing load to other servers.
Use as Mail Logger to Save any pass-by Emails for Mail Auditing
Here we introduce a scenario for using “Save pass-by emails” for Mail Audit along with other network equipments provided with other vendors. In the diagram below, the firewall is provided by Checkpoint; followed by Mail Spam Border Control provided by Barracuda. After that Microsoft’s Exchange server is used to received emails. Barracuda’s box is to screen all the junk emails before those junk emails reach Microsoft’s Exchange Server. All the other users are interacting with MS Exchange server directly to send/receive emails.
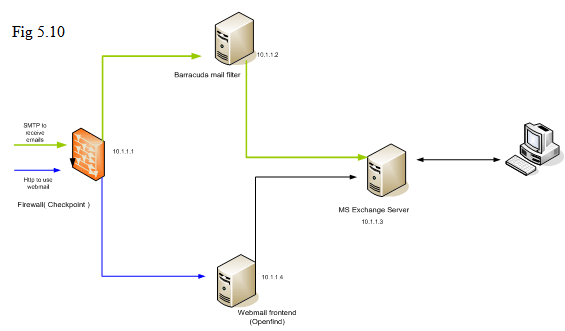
The purpose is to use a separate box to save extra copy of any emails before those emails arrive at MS Exchange server so that those emails can be kept for auditing purpose. To log all the arriving emails, we can deploy this “Mail Transport Filter” as “Mail logger” between Barracuda’s mail filter and MS Exchange.
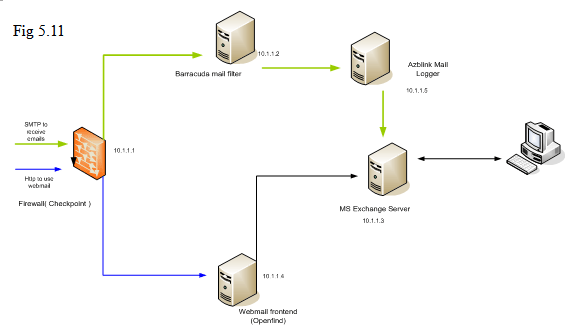
So, previously, Barracuda’s mail filter delivered emails to MS Exchange Server; it needs to change its destination to Azblink’s box. Of course, you need to allow the box to receive emails from Barracuda’s machine with specifying correct domain names to receive emails ( it can be done via Email->Basic->Hostname/Domain name ). In Azblink’s box, use “Email->Advanced->Mail Transport”. You can follow the instruction in our previous example to deliver the emails to MS Exchange server. To act as “Mail Logger”, click the checkbox on “Mail Transport filter” for “save pass-by emails”. This is for Inbound emails.
For outbound emails, it is necessary to make sure the outgoing emails from MS Exchange server will go through Azblink’s box. It can be done by using “relay”. On MS Exchange server, it is acting as “relay client” to Azblink’s box by setting its relay host ( “Smart host” in its term ) on MS Exchange server. In “Email->Advanced->Relay Control”, it should be set to allow emails coming from MS Exchange server.
Thus, all the outgoing/incoming emails have extra copy on the Mail Logger.
To view those saved emails, you can use user account “filter” from Webmail interface to view those saved emails. Those emails are arranged by YYYYMM/DD so that you can select those folders to browse the emails on a specific date. Furthermore, you can specify Search criteria with Sender and Receiver names on the mail header to find out the historical emails in the organization.
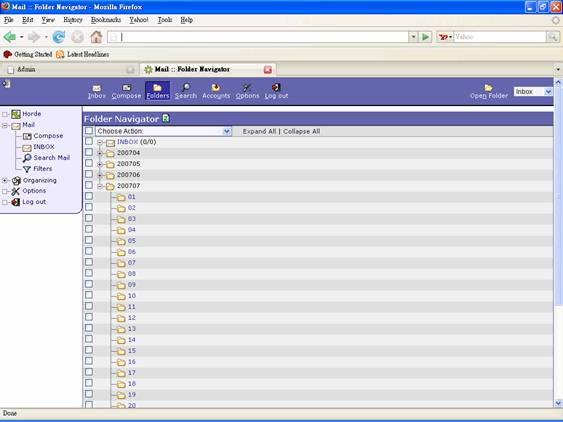
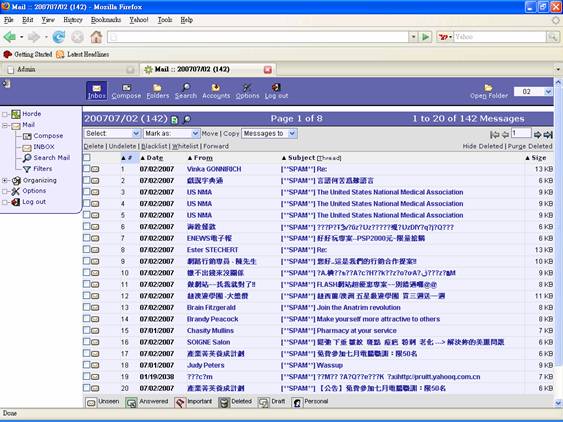
The account “filter” is also established in “Samba”. You can use it to copy the those folders for data backup and delete those folders on the Mail Logger. It is necessary to avoid the space of hard drive is filled up.
Web Mail Configuration
Web AP Proxy via directory
In the previous discussion, we did not mention anything about how to access those machines for users outside the firewall. The difficult is on that we work under the situation that only 1 public IP address is available. Thus, those methods like “port forwarding” from firewall to multiple machines located inside firewall need the existence of multiple public IP addresses to forward the traffic to different machines given the same TCP port number ( SMTP or POP3 ). Unless you want to use different ports for SMTP and POP3, that solution does not fit into this case.
This question shall be resolved by using the logic in application layer. The method introduced here to allow people access their email boxes located on different machines inside firewall is via the logic on http. The concept is quite simple: we map a host to a directory of another host which can be accessed via http from the network outside the firewall.
Let’s use the following diagram to explain more details. A, B, and C are three hosts located inside the firewall with private IP addresses 172.16.1.201, 172.16.1.201, and 172.16.1.203 respectively.
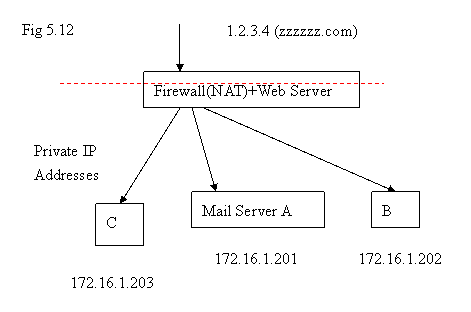
For incoming Emails, we can use “Mail Transport” to distribute Emails to machine A, B, and C. To let users access the mail boxes on A, B, or C from the network outside the firewall, we do the following mapping on http requests:
If the requests are of the type http://zzzzzz.com/hr, the http requests will go to machine A. Similarly,
http://zzzzzz.com/eng → ( http://172.16.1.202/ )
http://zzzzzz.com/it → ( http://172.16.1.203/ )
In other words, every URL stemmed from http://zzzzzz.com/hr will be processed by machine A. For example if a person issues http://zzzzzz.com/hr/apps/ from the place outside firewall, the webpage being displayed to this person is the page located the web directory “/apps/” on A ( 172.16.1.201 ). It looks like the content on machine A appears under a certain web directory of the web host zzzzzz.com via http://zzzzzz.com/dirName .
Azblink’s Enterprise platform is able to do this kind of mapping so that all the hosts behind the firewall can be mapped to web directories on a public access web server. So, this group of machines will look as one machine when you issue http request. And it can be done via the following steps on Web GUI of firewall machine:
Browse via System->Web->Proxy Map :
Remote Web URL: http://172.16.1.201/
Mapped local web directory: /hr
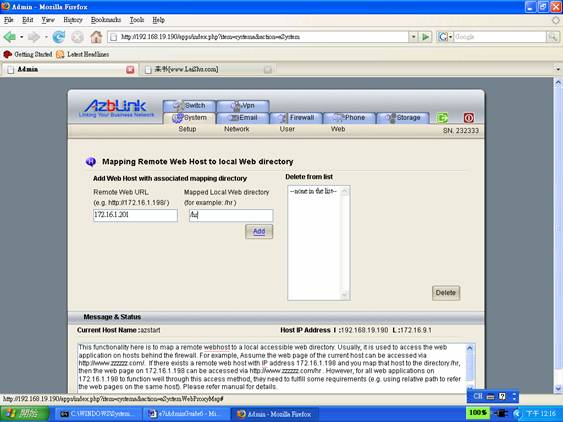
Thus, the request http://zzzzzz.com/hr will go to machine A ( 172.16.1.201 ) and the web page will be displayed back to the web browser you issue the request.
When you want to apply this approach to access web applications on the machines inside the firewall, the web applications shall avoid using http://machineName/path/ while trying to refer the webpage or action for the html form on the same host. Using “relative path” instead of “absolute path” to refer the web pages on the same host will make the web application work smoothly under this scenario. Then, there is no tweak to be done for this web application to function well by using this method.
Web Mail Configuration under Web directory proxy
Unfortunately, Web Mail does not fulfill the requirement above by using “relative path”; it needs some tweak to function well under the scenario mentioned above. On machine A, browse via Email->Advanced->Web Mail Proxy:
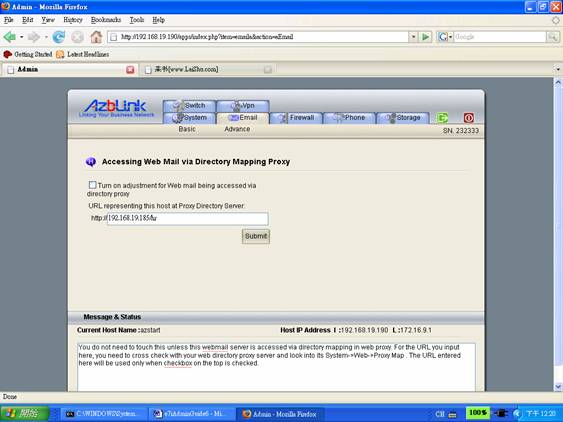
How do people access the host via that Web directory proxy method? “http://zzzzzz.com/hr” . Then, just type that information and press the checkbox to turn on adjustment and submit. So, the web mail on machine A can be accessed via
http://zzzzzz.com/hr/webmail/
Similarly, B and C can be accessed via
http://zzzzzz.com/eng/webmail/
http://zzzzzz.com/it/webmail/
Combining “Mail Transport” and Web mail via Directory Proxy, the 1-public-IP address solution for multiple machines inside firewall is complete. |