The Usage of DMZ ( De-military Zone ) of Border Control
We start with the review on how we partition the network region to apply the rules in the firewall.

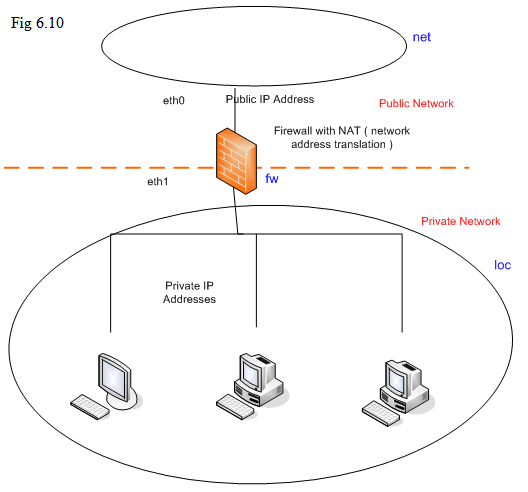
When only 2 Ethernet interfaces are present ( known as “eth0” and “eth1” ), we partition the whole network into 3 regions by labeling them as “loc”, “fw”, and “net”; the region “net” stands for the network connecting to the interface “eth0”, the region “loc” stands for the network connecting to the region “eth1”, and “fw” stands for the firewall machine itself.
By default, we allow any stations in “loc” to access the region “net” freely. From the region “net” to access the servers located in “loc”, Port Forwarding (DNAT) needs to be applied by adding the corresponding rules.
After the CD release at the date around September 2007 (internal code name for that CD release is “ted83.iso” ), the firewall will automatically be configured for the usage of DMZ when 3rd Ethernet interface “eth2” is present. For the previous releases, it was designed for the usage of two Ethernet interfaces; if the 3rd Ethernet interface “eth2” was present, the region connecting to “eth2” also belonged to “loc”. But starting from the release “ted83.iso”, the region connecting to “eth2” is labled as “dmz”.
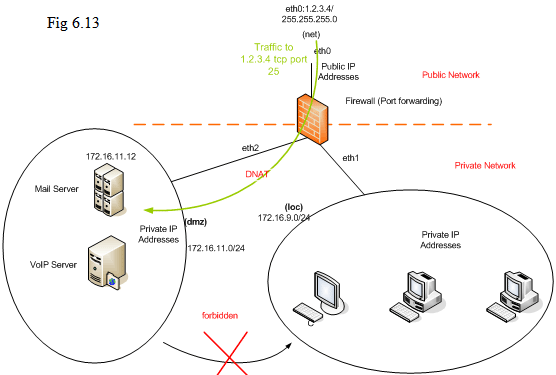
In previous releases, if “eth2” is present, it still belongs to the region “loc” with different subnet address space as the following diagram indicated. It is necessary to use the notation “loc:172.16.9.0/24” or “loc:172.16.10.0/24” to apply additional rules on a specific area in “loc” region. So, it can also achieve the similar configuration for DMZ functionalities in this way.

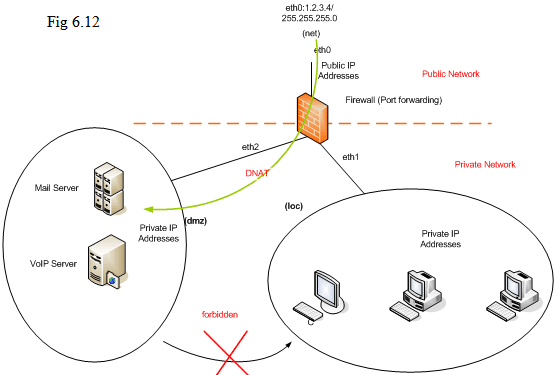
In the release of “ted83.iso”, “dmz” will show up when 3rd Ethernet interface “eth2” is present:

Some pre-defined rules already exist for “dmz” by default; those rules do not have to be added when you use the firewall; those predefined rules are not shown on the Web UI so that you should always keep in mind about those “pre-defined” rules: it is forbidden for those stations inside the region “dmz” to access the region “loc”; the firewall itself “fw” can not be accessed from “dmz” unless some additional rules are added into firewall for that action.
In our system, “dmz” is not completely “de-military” by default; you have to use “DNAT” action in the “Advanced menu” to forward the traffic into specific host in DMZ.
For example, if we want to forward the traffic associated with IP address “1.2.3.4” TCP port 25 to a host located in DMZ with private IP address 172.16.11.12,

If you only have one IP address 1.2.3.4 binding on “eth0”, you can just use
Action: DNAT
Source: net
Destination: dmz:172.16.11.12
Protocol: TCP
Destination Port: 25
If “IP Aliasing” is used by binding multiple IP addresses on “eth0”, it is necessary to specify “Original Destination IP” explicitly:
Action: DNAT
Source: net
Destination: dmz:172.16.11.12
Protocol: TCP
Destination Port: 25
Source Port: -
Original Destination IP: 1.2.3.4
The hosts in “loc” can use “172.16.11.12” to access that machine in “dmz” directly. If you prefer the traffic from “loc” with destination IP 1.2.3.4 and destination port TCP 25 to be forwarded to 172.16.11.12, you should add the following rule
Action: DNAT
Source: loc
Destination: dmz:172.16.11.12
Protocol: TCP
Destination Port: 25
Source Port: -
Original Destination IP: 1.2.3.4
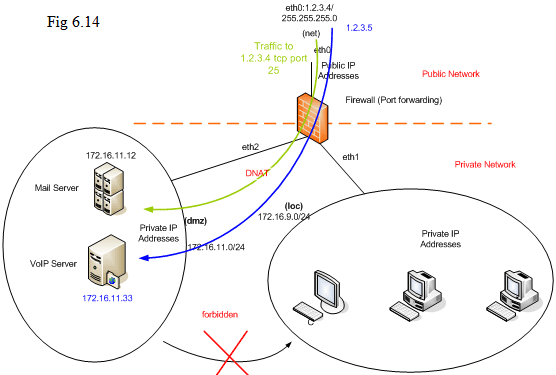
And let’s take a look at more examples. If you want to deploy a VoIP server into “dmz”, what is the necessary step to do? Assume “1.2.3.5” is the public IP address for this VoIP server known in the public internet and its private IP address is 172.16.11.33.

If the VoIP server is using IAX protocol, it is sufficient to forward UDP 4569 to the private address of that VoIP server:
Action: DNAT
Source: net
Destination: dmz:172.16.11.33
Protocol: UDP
Destination Port: 4569
Source Port: -
Original Destination IP: 1.2.3.5
If the VoIP server is using SIP ( Session Initialization Protocol ), then the situation is a little bit more complicated because it usually comes with stream using RTP ( Real-time Transport Protocol ). If it is using TCP/UDP 5060 for SIP and UDP ports 10000 to 20000 for RTP media stream, we should set
Action: DNAT
Source: net
Destination: dmz:172.16.11.33
Protocol: TCP
Destination Port: 5060
Source Port: -
Original Destination IP: 1.2.3.5
Action: DNAT
Source: net
Destination: dmz:172.16.11.33
Protocol: UDP
Destination Port: 5060
Source Port: -
Original Destination IP: 1.2.3.5
For the range of RTP ports, we can use
Action: DNAT
Source: net
Destination: dmz:172.16.11.33
Protocol: UDP
Destination Port: 10000:20000
Source Port: -
Original Destination IP: 1.2.3.5
Our philosophy is: you only need to open necessary ports and forward the traffic to the host – no other port should be opened for access to avoid the attack from the crackers.
But there is a chance that the communication scheme is quite complicated that it does not use any fixed TCP or UDP ports so that you have no way to use traditional rules. In this case, you might just forward “all the traffic” associated with a specific IP address to that host. For example,
Action: DNAT
Source: net
Destination: dmz:172.16.11.33
Protocol: TCP
Destination Port: -
Source Port: -
Original Destination IP: 1.2.3.5
The rule above just forwards all the TCP traffic to 172.16.11.33. You can forward all UDP traffic with similar scheme. In general, you should not do this because it just puts the firewall into no use by allowing any traffic to reach that host. |