- Prerequisite
- 1 machine
- 2 machines
- 3 machines
- Case study
- Mail Proxy Scenario
- Table Instruction
|
Basic Setting for Server
| |
Menu & Command |
Setting |
Detail Remark |
| Server with virtual IP |
System->Network->Internet |
|
|
| “Auto Setup” |
don't check the check box |
Server must set static IP |
| IP Address |
e.g:192.168.1.98 |
Server's IP can not be conflicted with the IP assigned by DHCP (if DHCP defined range is 100 to 200,then 98 is outside the range) |
| Netmask |
e.g:255.255.255.0 |
|
| Default Gateway |
e.g:192.168.1.1 |
Floodgate in order to connect the router which separates IP sector one. To regional network, any can even regard as the floodgate one to form the machine of the internet network directly. |
| Domain Name |
yourdomain.com |
Purchase domain name from the “vendor for domain name registration” |
| DNS Server |
e.g:168.95.1.1 |
DNS host's address that provider's or yourself. |
| DNS Server2 |
e.g:168.95.1.1 |
DNS host's address that provider's or yourself. |
| Host Name |
your Host Name |
every Server should have its Host Name, you can name it by your satisfied one |
| Server with Public IP |
System->Network->Internet |
|
|
| “Auto Setup” |
don't check the check box |
|
| IP Address |
e.g:61.218.89.123 |
the ip given by ISP |
| Netmask |
e.g:255.255.255.0 |
|
| Default Gateway |
e.g:61.218.89.121 |
Floodgate in order to connect the router which separates IP sector one. Default gateway of entity IP is usually all first or the end location IP which is set up this IP sector. |
| Domain Name |
yourdomain.com |
Purchase domain name from the “vendor for domain name registration” |
| DNS Server |
e.g:168.95.1.1 |
DNS host's address that provider's or yourself. *If the host is DNS , you have to enter the IP. |
| DNS Server2 |
e.g:168.95.1.1 |
DNS host's address that provider's or yourself. |
| Host Name |
your Host Name |
every Server should have its Host Name, you can name it by your satisfied one |
| Server with PPPOE IP |
System->Network->PPPoE |
|
|
| “Turn on PPPoE ” |
check the check box |
then submit |
| PPPoE Account |
please refer to ISP… |
Usually, different accounts will be provided by different ISP, just fill it in faithfully |
| Password |
please refer to ISP… |
enter password of this account |
| DNS Server IP Address |
please refer to ISP… |
given by the local ISP or DNS host's address that provider's IP address |
| MTU Setting |
1492 |
MTU is the abbreviation for Maximum Transmission Unit. Default value is recommended. |
|
| TOP |
|
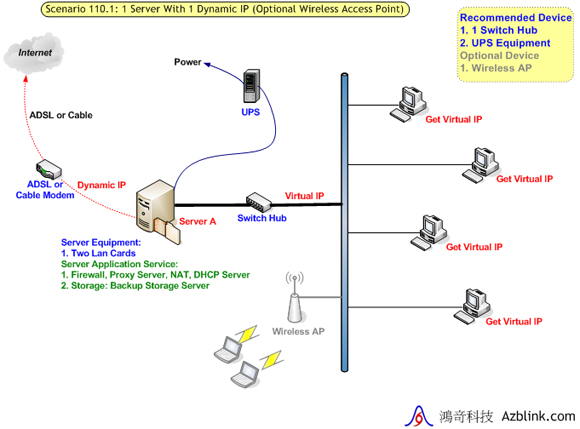
110.1

Server A
| Menu & Command |
The setting for example |
| System->Network->LAN/DHCP |
|
| LAN IP Address |
(192.168.2~254.1 or 172.16.0~254.1) 192.168.2.1 |
| LAN Netmask |
255.255.255.0 |
| Turn on DHCP Server |
Check the check box |
| DHCP Start IP |
(192.168.2~254.100 or 172.16.0~254.100) 192.168.2.100 |
| DHCP End IP |
(192.168.2~254.200 or 172.16.0~254.200) 192.168.2.200 |
| Dns->Tools->Options |
|
| Startup Domain Name Service (check box) |
If it isn't DNS Server, clear " the check box " and press "Reset" |
| Storage->Setting->Modify Backup Time |
|
| Add Backup Time |
24:00 hh:mm |
| Storage->Setting->Backup Rules |
|
| Clean Up All Temp Files Immediately |
Check the check box |
| Time Length for Keeping Data |
How many weeks |
| Threshold for Sending Alerts |
How many percent |
| Storage->Setting->Modify Threshold Mail Alert |
|
| Add Mail Account |
(need whole mail account) user@DomainName.com |
Wireless AP
A. Wireless access point
--- We just connect to network
B. Wireless IP sharing
1. Just connect to WAN will be separated from Intranet (LAN), unable to share resource of Intranet, such as printer sharing, file directory sharing.
2. Just connect to LAN (that means WAN won't use network cable) Can share resource provided by Intranet (LAN), such as printer sharing, file directory sharing, but we should close DHCP function of Wireless AP, and set fixed IP same as the range of Intranet (LAN). (If IP range of Wireless AP is unable to change, we must set system host's DHCP same as the range of Wireless AP.) |
| Basic Setting for Server TOP |
|
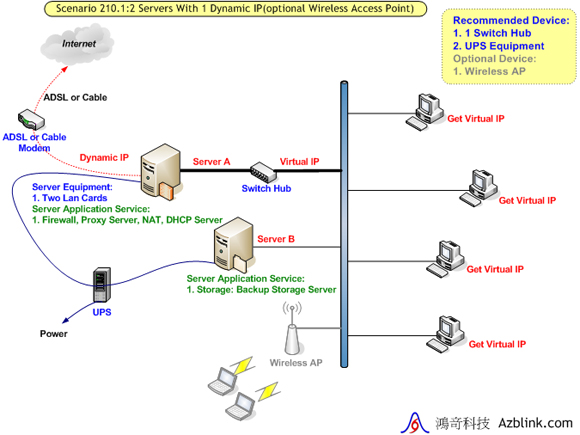
210.1

Server A
| Menu & Command |
The setting for example |
| System->Network->LAN/DHCP |
|
| LAN IP Address |
(192.168.2~254.1 or 172.16.0~254.1) 192.168.2.1 |
| LAN Netmask |
255.255.255.0 |
| Turn on DHCP Server |
Check the check box |
| DHCP Start IP |
(192.168.2~254.100 or 172.16.0~254.100) 192.168.2.100 |
| DHCP End IP |
(192.168.2~254.200 or 172.16.0~254.200) 192.168.2.200 |
| Dns->Tools->Options |
|
| Startup Domain Name Service (check box) |
If it isn't DNS Server, clear " the check box " and press "Reset" |
Server B
| Menu & Command |
The setting for example |
| System->Network->LAN/DHCP |
|
| LAN IP Address |
(Set a fixed virtual IP.) 192.168.2.2 |
| LAN Netmask |
255.255.255.0 |
| Turn on DHCP Server |
the check box must be disabled |
| Dns->Tools->Options |
|
| Startup Domain Name Service (check box) |
If it isn't DNS Server, clear " the check box " and press "Reset" |
| Storage->Setting->Modify Backup Time |
|
| Add Backup Time |
24:00 hh:mm |
| Storage->Setting->Backup Rules |
|
| Clean Up All Temp Files Immediately |
Check the check box |
| Time Length for Keeping Data |
How many weeks |
| Threshold for Sending Alerts |
How many percent |
| Storage->Setting->Modify Threshold Mail Alert |
|
| Add Mail Account |
(need whole mail account) user@DomainName.com |
Wireless AP
A. Wireless access point
--- We just connect to network
B. Wireless IP sharing
1. Just connect to WAN will be separated from Intranet (LAN), unable to share resource of Intranet, such as printer sharing, file directory sharing.
2. Just connect to LAN (that means WAN won't use network cable) Can share resource provided by Intranet (LAN), such as printer sharing, file directory sharing, but we should close DHCP function of Wireless AP, and set fixed IP same as the range of Intranet (LAN). (If IP range of Wireless AP is unable to change, we must set system host's DHCP same as the range of Wireless AP.) |
| Basic Setting for Server TOP |
|
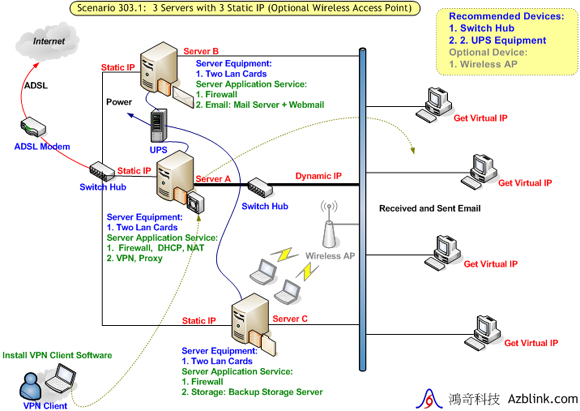
301.1

Server A
| Menu & Command |
The setting for example |
| System->Network->LAN/DHCP |
|
| LAN IP Address |
(192.168.2~254.1 or 172.16.0~254.1) 192.168.2.1 |
| LAN Netmask |
255.255.255.0 |
| Turn on DHCP Server |
Check the check box |
| DHCP Start IP |
(192.168.2~254.100 or 172.16.0~254.100) 192.168.2.100 |
| DHCP End IP |
(192.168.2~254.200 or 172.16.0~254.200) 192.168.2.200 |
| Dns->Tools->Options |
|
| Startup Domain Name Service (check box) |
If it isn't DNS Server, clear " the check box " and press "Reset" |
| VPN->Connection->Address Pool |
|
| Network Address |
(You must designate subnet when use VPN. To avoid network conflict, you should not use the same subnet at any other places within this local network environment.) 172.16.38.0 |
| Netmask |
(refer to the VPN subnet) 255.255.255.0 |
| Maximum Number Of Concurrent Clients |
Maximum number you permit, use default if no particular need |
| Turn Off VPN Server Process |
If you want to turn off all VPN conections with the Sever, check the check box and then submit |
| VPN->Connection->Pushed setting |
|
| Destination Network |
(You had better set up two groups, subnet of VPN / subnet of destination) 172.16.38.0 / 192.168.2.0 |
| Netmask |
(refer to the subnet)255.255.255.0 |
| VPN->Connection->Key Generation |
|
| Country Code/State Code/Locality/Org. Name/Org. Unit/Email |
any key (no need to change unless you plan to arrange these codes newly) |
| CA Generation / Cert. & Key for Server Common Name |
any key (no need to change it once the authorization files be generated, unless you should update Key) |
| Cert. & Key for Client(s) Common Name |
any key |
| Client Configuration Set List |
Every Common Name should be unique. If common names are not shown here, it means the common name could be duplicated, not safe for Client to use. In this case, you might as well just clean up everything by pressing "Purge" button. |
| VPN->Connection->Client File Download |
|
| Client Configuration Set List |
"Per User Key Download" means to download VPN client configuration files;"Client Program Download" means to download all VPN client package on Windows.After all VPN setting completed, please press"Reload" |
Server B
| Menu & Command |
The setting for example |
| System->Network->LAN/DHCP |
|
| LAN IP Address |
(Set a fixed virtual IP.) 192.168.2.2 |
| LAN Netmask |
255.255.255.0 |
| Turn on DHCP Server |
the check box must be disabled |
| Dns->Tools->Options |
|
| Startup Domain Name Service (check box) |
If it isn't DNS Server, clear " the check box " and press "Reset" |
| Email->Basic->Domain/Host |
|
| Domain Name Specific for Sending Mail |
DomainName.com |
| Host Name Specific for Sending Mail |
mail.DomainName.com |
| Email->Basic->Web Mail |
|
| Web Mail Title Setting |
(set the name you lik for web mail, it will be shown when you sign in) Azblink Mail Service |
| Email->Advanced->Relay Control |
The setting that mail storage on host that not mail host |
| IP Address or subnet for sending out emails from the Server without authentication |
(Allow users in this network to send out emails without authentication.)192.168.2.0/24 |
Server C
| Menu & Command |
The setting for example |
| System->Network->LAN/DHCP |
|
| LAN IP Address |
(Set a fixed virtual IP.) 192.168.2.3 |
| LAN Netmask |
255.255.255.0 |
| Turn on DHCP Server |
the check box must be disabled |
| Dns->Tools->Options |
|
| Startup Domain Name Service (check box) |
If it isn't DNS Server, clear " the check box " and press "Reset" |
| Storage->Setting->Modify Backup Time |
|
| Add Backup Time |
24:00 hh:mm |
| Storage->Setting->Backup Rules |
|
| Clean Up All Temp Files Immediately |
Check the check box |
| Time Length for Keeping Data |
How many weeks |
| Threshold for Sending Alerts |
How many percent |
| Storage->Setting->Modify Threshold Mail Alert |
|
| Add Mail Account |
(need whole mail account) user@DomainName.com |
Wireless AP
A. Wireless access point
--- We just connect to network
B. Wireless IP sharing
1. Just connect to WAN will be separated from Intranet (LAN), unable to share resource of Intranet, such as printer sharing, file directory sharing.
2. Just connect to LAN (that means WAN won't use network cable) Can share resource provided by Intranet (LAN), such as printer sharing, file directory sharing, but we should close DHCP function of Wireless AP, and set fixed IP same as the range of Intranet (LAN). (If IP range of Wireless AP is unable to change, we must set system host's DHCP same as the range of Wireless AP.) |
| Basic Setting for Server TOP |
|
Small Size Business1

Server A
| Menu & Command |
The setting for example |
| System->Network->LAN/DHCP |
|
| LAN IP Address |
(Set a fixed virtual IP.) 192.168.2.2 |
| LAN Netmask |
255.255.255.0 |
| Turn on DHCP Server |
the check box must be disabled |
| Dns->Tools->Options |
|
| Startup Domain Name Service (check box) |
If it isn't DNS Server, clear " the check box " and press "Reset" |
| VPN->Connection->Address Pool |
|
| Network Address |
(You must designate subnet when use VPN. To avoid network conflict, you should not use the same subnet at any other places within this local network environment.) 172.16.38.0 |
| Netmask |
(refer to the VPN subnet) 255.255.255.0 |
| Maximum Number Of Concurrent Clients |
Maximum number you permit, use default if no particular need |
| Turn Off VPN Server Process |
If you want to turn off all VPN conections with the Sever, check the check box and then submit |
| VPN->Connection->Pushed setting |
|
| Destination Network |
(You had better set up two groups, subnet of VPN / subnet of destination) 172.16.38.0 / 192.168.2.0 |
| Netmask |
(refer to the subnet)255.255.255.0 |
| VPN->Connection->Key Generation |
|
| Country Code/State Code/Locality/Org. Name/Org. Unit/Email |
any key (no need to change unless you plan to arrange these codes newly) |
| CA Generation / Cert. & Key for Server Common Name |
any key (no need to change it once the authorization files be generated, unless you should update Key) |
| Cert. & Key for Client(s) Common Name |
any key |
| Client Configuration Set List |
Every Common Name should be unique. If common names are not shown here, it means the common name could be duplicated, not safe for Client to use. In this case, you might as well just clean up everything by pressing "Purge" button. |
| VPN->Connection->Client File Download |
|
| Client Configuration Set List |
"Per User Key Download" means to download VPN client configuration files;"Client Program Download" means to download all VPN client package on Windows.After all VPN setting completed, please press"Reload" |
Server B
| Menu & Command |
The setting for example |
| System->Network->LAN/DHCP |
|
| LAN IP Address |
(Set a fixed virtual IP.) 192.168.2.3 |
| LAN Netmask |
255.255.255.0 |
| Turn on DHCP Server |
the check box must be disabled |
| Dns->Tools->Options |
|
| Startup Domain Name Service (check box) |
If it isn't DNS Server, clear " the check box " and press "Reset" |
| Email->Basic->Domain/Host |
|
| Domain Name Specific for Sending Mail |
DomainName.com |
| Host Name Specific for Sending Mail |
mail.DomainName.com |
| Email->Basic->Web Mail |
|
| Web Mail Title Setting |
(set the name you lik for web mail, it will be shown when you sign in) Azblink Mail Service |
| Email->Advanced->Relay Control |
The setting that mail storage on host that not mail host |
| IP Address or subnet for sending out emails from the Server without authentication |
(Allow users in this network to send out emails without authentication.)192.168.2.0/24 |
Server C
| Menu & Command |
The setting for example |
| System->Network->LAN/DHCP |
|
| LAN IP Address |
(192.168.2~254.1 or 172.16.0~254.1) 192.168.2.1 |
| LAN Netmask |
255.255.255.0 |
| Turn on DHCP Server |
Check the check box |
| DHCP Start IP |
(192.168.2~254.100 or 172.16.0~254.100) 192.168.2.100 |
| DHCP End IP |
(192.168.2~254.200 or 172.16.0~254.200) 192.168.2.200 |
| Dns->Tools->Options |
|
| Startup Domain Name Service (check box) |
If it isn't DNS Server, clear " the check box " and press "Reset" |
| Storage->Setting->Modify Backup Time |
|
| Add Backup Time |
24:00 hh:mm |
| Storage->Setting->Backup Rules |
|
| Clean Up All Temp Files Immediately |
Check the check box |
| Time Length for Keeping Data |
How many weeks |
| Threshold for Sending Alerts |
How many percent |
| Storage->Setting->Modify Threshold Mail Alert |
|
| Add Mail Account |
(need whole mail account) user@DomainName.com |
Wireless AP
A. Wireless access point
--- We just connect to network
B. Wireless IP sharing
1. Just connect to WAN will be separated from Intranet (LAN), unable to share resource of Intranet, such as printer sharing, file directory sharing.
2. Just connect to LAN (that means WAN won't use network cable) Can share resource provided by Intranet (LAN), such as printer sharing, file directory sharing, but we should close DHCP function of Wireless AP, and set fixed IP same as the range of Intranet (LAN). (If IP range of Wireless AP is unable to change, we must set system host's DHCP same as the range of Wireless AP.) |
| Basic Setting for Server TOP |
|
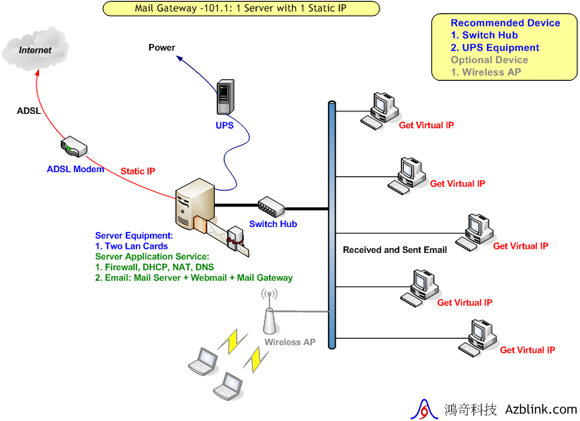
101.1

Border Control + Mail Server + Mail Proxy
| Menu & Command |
Setting |
| System->Network->Internet |
|
| IP Address |
61.218.89.123 |
| Netmask |
255.255.255.0 |
| Default Gateway |
61.218.89.121 |
| Domain Name |
azblink.com |
| DNS Server |
61.218.89.123(Suppose it's also DNS Server.) |
| DNS Server2 |
168.95.1.1 |
| Host Name |
abc(set whatever you like, must be English or numbers, avoids using distinctive marks.) |
| System->Network->LAN/DHCP |
|
| LAN IP Address |
172.16.9.1 |
| LAN Netmask |
255.255.255.0 |
| Turn on DHCP Server |
check the check box if hope the Server work as DHCP Server, otherwise, just cancell it |
| DHCP Start IP |
172.16.9.100(may voluntarily establish the range you need) |
| DHCP End IP |
172.16.9.200(may voluntarily establish the range you need) |
| Dns->Domain Zone->Zones Manager |
|
| Zone View (click the zone IP to view) |
azblink.com |
| Zone View (click the zone IP to view) |
61.218.89 |
| Name Server (NS) records Host |
ns0.azblink.com. |
| Address (A) records Host |
ns0 |
| Address (A) records IP Address |
61.218.89.123 |
| Address (A) records Host |
@ |
| Address (A) records IP Address |
61.218.89.123 |
| Canonical Name (CNAME) Records Alias |
mail |
| Canonical Name (CNAME) Records NS |
ns0 |
| Mail Exchange (MX) Records Pref |
10 |
| Mail Exchange (MX) Records Name |
mail |
| Border Control->Advanced->Add Rule |
|
| Action |
ACCEPT |
| Source |
net |
| Destination |
fw |
| Protocol |
udp |
| Destination port |
53 |
| Border Control->Basic->LAN-NETLoopback |
|
| Source Network in LAN |
172.16.9.0/24 |
| IP of Original Destination outside |
61.218.89.123 |
| Protocol |
TCP |
| Port Number |
80 |
| New Destionation IP in LAN |
172.16.9.1 |
| Border Control->Basic->LAN-NETLoopback |
|
| Source Network in LAN |
172.16.9.0/24 |
| IP of Original Destination outside |
61.218.89.123 |
| Protocol |
TCP |
| Port Number |
8081 |
| New Destionation IP in LAN |
172.16.9.1 |
| Email->Basic->Domain/Host |
|
| Domain Name Specific for Sending Mail |
azblink.com |
| Host Name Specific for Sending Mail |
mail.azblink.com |
| Email->Basic->Web Mail |
|
| Web Mail Title Setting |
Set the name you need, must be English or number |
| Email->Advanced->Mail Transport |
|
| Distributing Received eMails to Subdomain(s): Transport to other host(s) |
check the check box and then submit |
| Transport Filter: Tag Spam eMails / Save Any Pass-by emails / No Spam Email Propagation |
choose functions you need and then submit |
Wireless AP
A. Wireless access point
--- We just connect to network
B. Wireless IP sharing
1. Just connect to WAN will be separated from Intranet (LAN), unable to share resource of Intranet, such as printer sharing, file directory sharing.
2. Just connect to LAN (that means WAN won't use network cable) Can share resource provided by Intranet (LAN), such as printer sharing, file directory sharing, but we should close DHCP function of Wireless AP, and set fixed IP same as the range of Intranet (LAN). (If IP range of Wireless AP is unable to change, we must set system host's DHCP same as the range of Wireless AP.) |
| Basic Setting for Server TOP |
|